Small Bits of Paper: Plantin SchoolBook

Showing posts with label Plantin SchoolBook. Show all posts

Birthday Cards

Thursday, August 30, 2012
I'm so pleased to be showing you a couple of birthday cards that I recently made.  I'm highlighting them at My Craft Spot today as well.  It seems as though negative space is all the rage right now and I've been so inspired by the many cards I've seen that I decided to use the same technique on my cards.  It's quite an easy technique but one that really makes a statement.  Everybody seemed especially impressed with these two cards... and they really were quite simple to put together!  


I made the first card as an extra for my daughter's 18th birthday.  I used my paper cutter to cut the card base and patterned paper mat and then used my Gypsy to cut the top layer with George and Basic Shapes, with "18" cut out of the cardstock using Plantin SchoolBook.  Corners are all rounded with the Creative Memories corner rounder.  Once cut, I embossed the top layer using my Cuttlebug using the "Bloom Dots" folder.  I attached the top layer using pop dots to leave some space between the patterned paper and cardstock.


To finish things off, I cut a tiny tag and shadow from the My Craft Spot Tiny Tags metal die set and stamped it with a little sentiment from the My Craft Spot Tiny Tags 2 set.  I finished everything off with some Blueberry Blue baker's twine from My Craft Spot.


The second card was made for my daughter's boyfriend.  I used the same technique as I had used for Erin's card, but this time, cut the word "birthday" using Opposites attract.  The little balloons are from Celebrations and tied with Blueberry Blue baker's twine from My Craft Spot.

I finished the front of the card by using a stamp from My Craft Spot's Sweet Sentiments - Set #1, using some cellophane tape to cover the "birthday" portion of the stamp.  If you try this, just remember to remove the cellophane prior to stamping!  

Don't forget that the My Craft Spot Fall Stamp Release Party starts on Monday - and you are ALL invited!!  Check HERE for more details.

Also, I am giving away a $15US gift certificate to My Craft Spot.  Click HERE to enter if you haven't already!  
18

Penguin at the Beach

Monday, August 6, 2012
Hello from Niagara Falls!  I feel like I've hardly been home at all this summer - but I'm not complaining one bit!  I am so incredibly blessed to have such wonderful holidays and am enjoying every minute.  I'll be home again next week though... to stay - and will have almost two weeks off before I head back to work.  I have accepted a new position at a local college which means no more commute!!  I'm so excited!  I do have lots to pack into those two weeks but am really hoping to pay more visits to my blogging friends.


This week's challenge at Fantabulous Cricut is "Jump In and Cool Off" which is perfect for the hot and humid weather we've been having!  We are challenging you to create a project with a water theme (i.e., pool, beach, waterpark, etc.).  I decided to make an island beach card for my youngest who LOVES penguins. 

Please head over to Fantabulous Cricut and see what the rest of the design team has made for this week's challenge!  There are some great projects posted!

Recipe:
Penguin - Christmas Cheer
Duck ring and beach ball - Everyday Paper Dolls
Waves - Plantin SchoolBook and Cuttlebug D'Vine Swirls embossing folder
Palm tree - Create a Critter and Cuttlebug Herringbone embossing folder
Sun - Celebrate with Flourish
Island - Just Because Cards
Cloud background - Peachy Keen Stamps
Glossy Accents
Heart Gem
23

Some Bunny Loves You Treat Bags

Monday, April 2, 2012
With Easter less than a week away, this week's challenge at My Craft Spot will inspire you to finish up all those last minute projects!  For our Easter Challenge, I decided to make some little treat bags for my favourite little people.  (That said, my 14 year old son is now taller than my daughter and me!!)

With the help of my Gypsy, I designed the little treat bags by welding various images from Easter 2010, Plantin SchoolBook and George and Basic Shapes.  The sweet little bunnies are from Paper Doll Dress Up and I used cuts from George and Basic Shapes for the noses and ears.  The fences are from Wall Décor and More (with the roosters cut off) and the grass is from Zooballoo.  Everything is inked.

 
I filled each bag with some kraft grass and punched out the "Some bunny loves you" sentiments (from My Craft Spot's NEW Happy Easter stamp set) with Stampin' Up punches, adhering them to souvlaki skewers which I cut to size.  I finished everything off with some buttons and Cotton Candy baker's twine from My Craft Spot.

Please head over to My Craft Spot to see the rest of the wonderful Easter projects created by other members of the design team - and then link up your own project for a chance to win this week's prize! 
32

Rubber Duckie, You're The One!

Monday, February 27, 2012

View my Fantabulous Cricut post HERE

This week at My Craft Spot, we want you to make us laugh!


For ages now, I've wanted to make a card for my husband using Ernie's "Rubber Duckie" song (from Sesame Street) as inspiration - so that's just what I did.  Our anniversary isn't until July so I'm well ahead of the game.  I suppose that the bath time part of the song is a bit, um, suggestive (albeit true!) - but as I really am awfully fond of my husband, the sentiment fits that he's the one for me.  He is my very best friend, my joy of joys and I'm beyond blessed and so very lucky that he's mine.

I created my window card using Plantin SchoolBook for the base and Elegant Edges for the window and scalloped frame.  The tub is from New Arrival and the sweet little rubber duck (which is popped on my card) is from Kate's ABCs.  I punched out little hearts for the corners and did some inking and doodling. I finished off the outside with some Caribbean baker's twine from My Craft Spot.


For the inside of the card, I used stamps from My Craft Spot's Always & Forever set (Happy Anniversary and the little heart).  I also got creative with mixing and matching stamps from My Craft Spot's Friends & Neighbours and Inside & Out Set #2 in order to make the "You're the one" sentiment. I cut a second rubber duck and created a little border using a punch from Stampin' Up to add some more interest to the inside as well. 

I am very much looking forward to seeing what you create for the My Craft Spot challenge this week.  I've got a full week ahead of me and will need some humour to keep me going.  I'll leave you with the Rubber Duckie song to listen to as you get creating!

35

Girly Girl Birthday Card

Monday, February 13, 2012
Click HERE to see today's
Fantabulous Challenge project post.

My niece will be 14 on Sunday and I made this card for her.  Sophie is all girl so the timing is perfect for this week's My Craft Spot "Girly Girl" project challenge.


I used Elegant Edges and Plantin SchoolBook for the card base.  The pink mat is cut from a metallic paper and embossed with my Cuttlebug.


The snail is from Paisley and cut with scraps left over from my Valentine's Day projects.  I enlarged the flower on the shell in order to cut a circle big enough for the little treats cup from Stampin' Up.  I filled the cup with pink Smarties (candy coated milk chocolate).  The fun googly eyes were a gift from my sweet friend Carri at DoubleClick Connections.  I've looked all over for them and have never been able to find them around here - so Carri very kindly sent me a pack.  They're always a hit on my critter cards!


The sentiment is from My Craft Spot's Friends & Neighbours Inside & Out stamp set.  I punched it out with a Stampin' Up punch and layered it over the negative cut from the flower on the snail.  I did lots and lots of doodling on my card, using both a white gel pen and black marker.  I also dressed up my snail with some snow white crinkle ribbon and Divine Valentine baker's twine - both from My Craft Spot.


The inside of my card was stamped with a sentiment from My Craft Spot's Candy Corn Kisses stamp set.  Although the stamps are from a Halloween line, I thought the sentiment was perfect with the candy card I had made. 

Please head over to My Craft Spot to check out the rest of the Girly Girl projects made by the design team - and then be sure to create your own and link up to be eligible for this week's fabulous prize!

*I will also be linking up this card for this week's Exploring Cricut Challenge: It's So Sweet. 
34

You're a Cut Above Card

I've always enjoyed plays on words and so was delighted to learn of this week's Fantabulous Cricut challenge: Fun with Puns.  I had a few different ideas in mind but when my daughter asked me to make a thank you card for our hair stylist, my decision was made.  (Thanks to all of you who voted for Erin's Valentine photo on our stylist's Facebook page.  Erin and Kyle came first so won the big prize of a dinner for two, flowers, chocolates and a hair do!  As such, a thank you card for the stylist was in order.)


I used Elegant Edges and Plantin SchoolBook to make the card base and the whimsical red mat.  The scissors and swirl are from Wall Décor and More and cut from a metallic cardstock. I added a brad from my stash.  I used a paper trimmer to cut the 3 layers of mats and embossed the top layer with my Cuttlebug, using a folder from the Give a Hoot companion set.   I inked the edges with Chocolate Chip ink from Stampin' Up.  The sentiment is from Scrappy Moms Stamps Quirky Quotes stamp set.  I finished things off with three red pearls and some chocolate crinkle ribbon from My Craft Spot

There are some great pun projects at Fantabulous Cricut this week so be sure to head over and see what the rest of the design team has come up with - and to link up your own card!
21

My Craft Spot Valentine Stamp Release & Giveaway

Thursday, February 2, 2012
I am so excited to be showing you some of the projects that I've made with the new My Craft Spot Valentine stamp sets:  Build a Valentine and Always and Forever.  These sets are just perfect for creating all sorts of Valentine and love projects.  There's even an anniversary stamp!


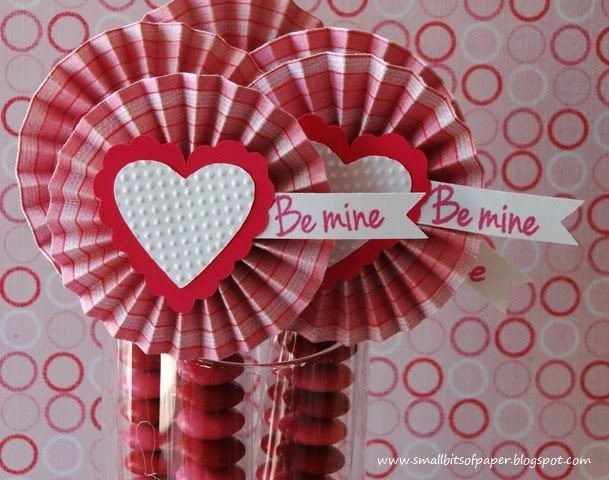
My first project is a set of cello bags filled with red and pink Smarties (candy coated milk chocolate, similar to - but much better than - MandMs).


For the toppers, I made rosettes from patterned paper and then added hearts from Gypsy Wanderings.  The white hearts are embossed using the inside of a 3x3 Cuttlebug butterfly folder.  I finished things off with a little "Be mine" tag from the Always and Forever set.  These treats are currently displayed on our dining room table and make for a lovely way to decorate for Valentine's Day - with a treat to enjoy at the end!


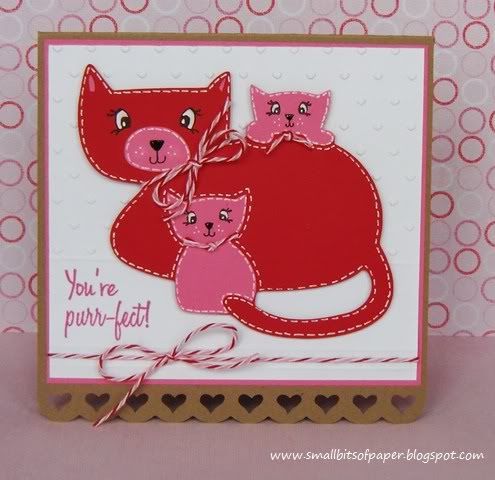
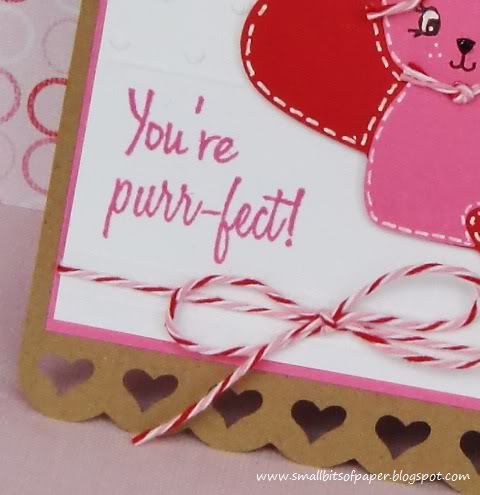
The base of this card was made with Elegant Edges and Plantin' SchoolBook.  I embossed the top portion of the white mat with a tiny hearts folder from the Cuttlebug Love Language set and scored some lines with my Martha Stewart score board.  The cat image is from Meow and I stamped the cats' eyes with stamps from Peachy Keen.  The noses are covered with Glossy Accents and I drew the little mouths by hand.


The sentiment is from the new Build a Valentine set and I finished things off with some fun Divine Valentine twine from My Craft Spot and lots of faux stitching.


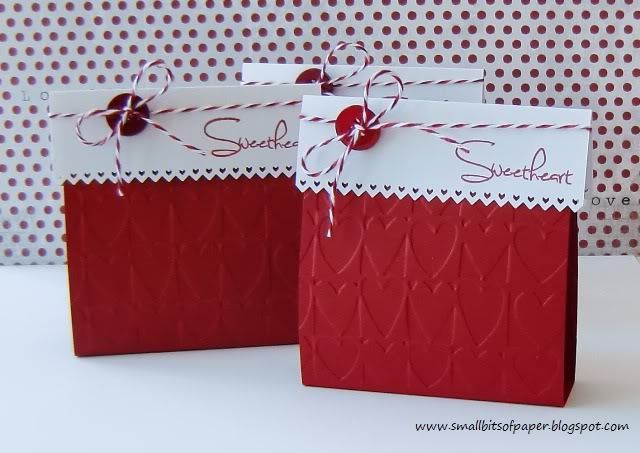
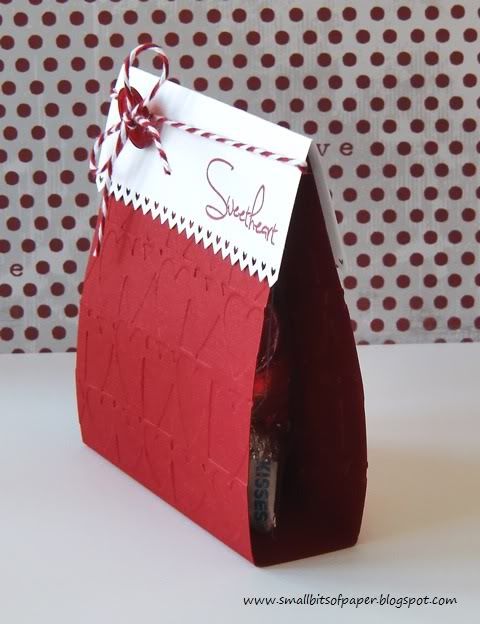
These candy tents were cut by hand, with the topper punched with a Stampin' Up border punch.  The bases of the tents were run through the Cuttlebug using the Heart Blocks embossing folder.


I stamped the tops with a Sweetheart sentiment from Always and Forever.  I added some baker's twine from My Craft Spot and a button to each - as well as a little baggie of Hershey's Kisses - to complete my project.


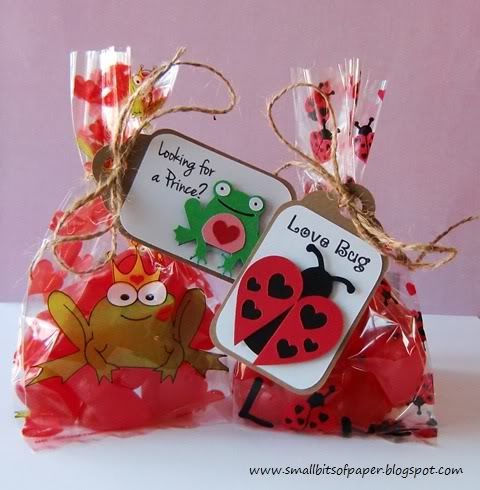
When I saw these treat bags at our local Bulk Barn, I couldn't believe my eyes!  It looks as though they were made to go with the Build a Valentine set from My Craft Spot!  Of course, I had to buy some and filled them with some heart-shaped jujubes. Both tags were cut using Wrap It Up and tied with some twine from my stash.  The tags were quick and easy to put together - but make for such a fun way to dress up the bags.


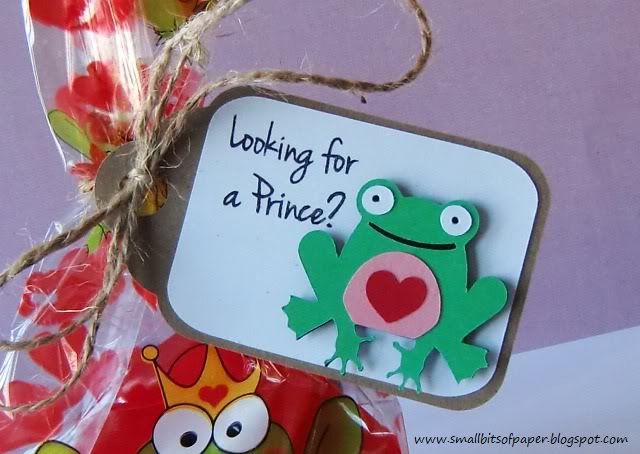
For the frog bag, I cut a little frog from Paisley and then stamped the "Looking for a prince?" sentiment from Build a Valentine.


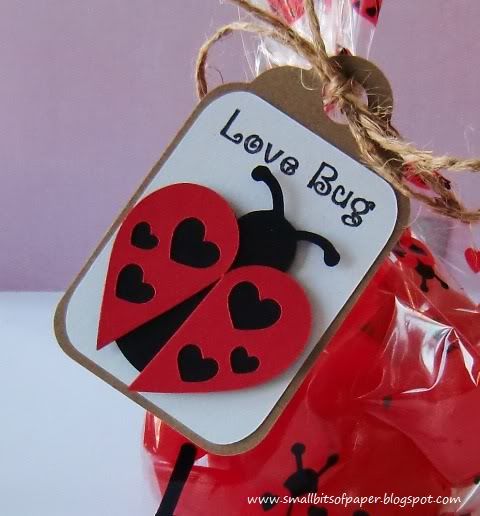
The base of the ladybird is from Walk In My Garden and I created the custom wings (to coordinate better with the ladybirds on the bag) using hearts from Create a Critter, cutting the larger heart in half.  The "Love Bug" sentiment is also from Build a Valentine.


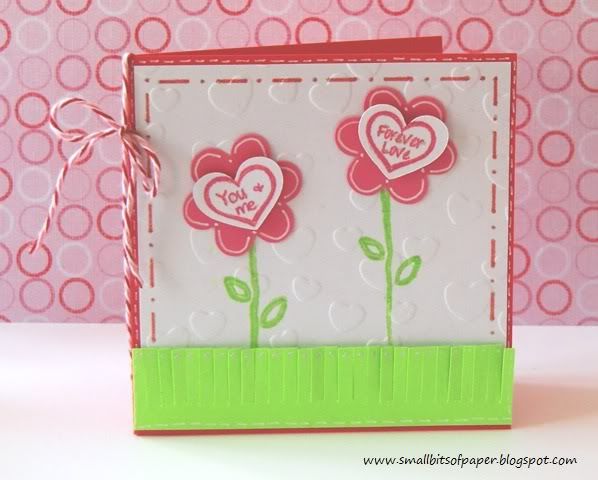
My final project is a little card made with conversation heart stamps from Build a Valentine.  I stamped the hearts on little hearts cut from Create a Critter.  The flowers were also cut from Create a Critter.  The stems are stamped and the mat embossed with a Hallmark embossing folder.  The grass was cut using Martha Stewart fringe scissors.  I did some doodling and also went over the sentiment and pink "stitching" and grass with a Stardust gel pen - so there's a nice glimmer in real life.  I finished everything off with some Divine Valentine twine from My Craft Spot.

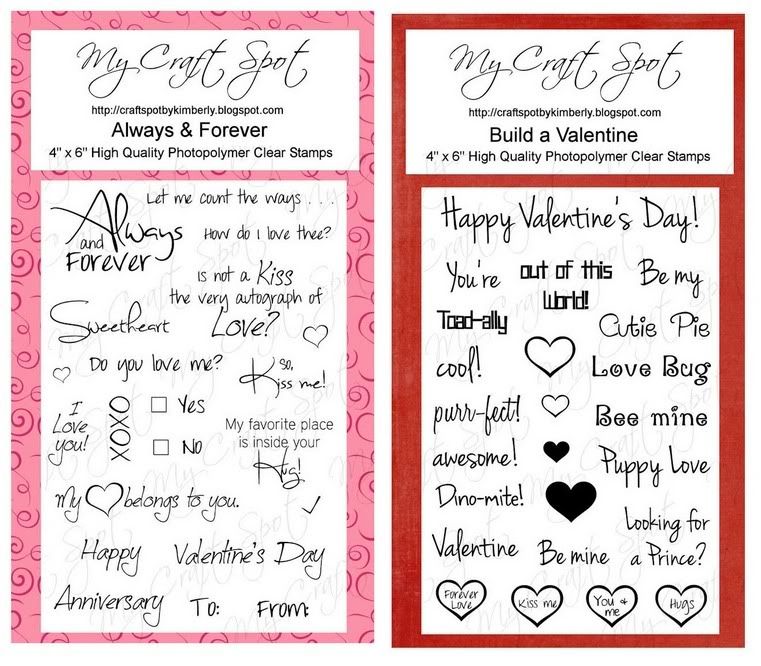
Here are the full sets of the stamps I've used for my projects above.  For many more project ideas and inspiration, head to My Craft Spot to see what Kimberly and the rest of the design team have been making!  I always love to see the different ideas and creations.

~ G I V E A W A Y ~
How would you like to win a My Craft Spot stamp set of your choice?  Kimberly has very generously donated a set to be given away on my blog.  All you need to do is:
  1. make sure you are a follower here at Small Bits of Paper
  2. leave a comment on this post.  
Don't forget to tell me which My Craft Spot stamp set is your favourite, in case you are the winner!  I will draw a name at random and announce the winner on Monday, so you have until Sunday at noon (EST) to enter.

~ W I N N E R S ~
Thanks to all of you who left such lovely comments last week's blog hops!  The winner of the $10 My Craft Spot gift certificate for the Cards for Kids Valentine's Day Blog Hop is Larelyn of Handmade from My Heart and the winner of the $10 My Craft Spot gift certificate for the Cricut Craftin' Grammy's Cricut Friends Blog Hop is Bobby of Bits & Pieces.  Congratulations Larelyn and Bobby!!  Please email me at smallbitsofpaper @ hotmail.com [remove spaces] so I can arrange to have your gift certificates sent to you.

*I am going to link up my Smarties tubes and Sweetheart tents at Decorate to Celebrate, where this week's theme is Valentine's Day Party.
61

Subway Art

Monday, October 10, 2011
Happy Thanksgiving!!
(In Canada, Thanksgiving is always celebrated on the second Monday of October.)

It's all about wall décor this week at Fantabulous Cricut. I've been wanting to try some subway art for some time now, so decided that this would be the perfect opportunity to give it a go!

I first purchased a white canvas and painted it with a light brown acrylic paint.  (It's got a lovely distressed look in person, but it doesn't show up in the photo.)  I then used my Gypsy to design the art. To do this, I added a rectangle to my Gypsy design which was an inch smaller than my canvas. (My canvas is 12x16, so I created a rectangle to be 11x15.) Then I designed the phrases using a variety of fonts, extending each expression to 11 inches in order to have both sides justified. I cut the art from a piece of brown Cricut vinyl. I learned the hard way that one should never cut vinyl on a new mat. It was quite a pain to get the white backing off the mat once I'd removed the vinyl!  I had to remind myself to give thanks in all things and to choose to be happy!!

(The "Choose to be happy" portion is a scaled down version of wall art in my office which I posted about HERE.)

There are some wonderful creations for view at Fantabulous Cricut.  Head over to see what the rest of the design team has been working on - and to link up your own wall décor project.

Cartridges used:
Cuttin' Up
Jubilee
Gypsy Font
Nursery Rhymes
Kate's ABCs
Opposites Attract
Printing 101
Plantin SchoolBook
37

Fall Leaves

Monday, September 19, 2011
It's time for another challenge at My Craft Spot!  This week, the theme is "Fall Leaves".  Here in central Ontario, the leaves are just starting to change colour - thanks to the cooler temperatures we have been having.
I created my little scene using Campin' Critters, adding some extra little leaves cut from Create a Critter.  The card base was created by welding a frame from Elegant Edges (with thanks to my husband for hitting almost every Michaels in the Greater Toronto Area with me in order to find this cartridge!) and George and Basic Shapes.  The banner is a parenthesis from Plantin' SchooolBook, with the ends cut with a punch from Creative Memories, and stamped with two stamps from My Craft Spot's Happy Fall set.  I did some inking and some drawing and then finished everything off with some glorious My Craft Spot marmalade crinkle ribbon.

If you haven't checked them out already, please head to My Craft Spot to see the other "Fall Leaves" projects created by the rest of the design team.  Then link your own project to be eligible for this week's prize!

(Also, just a heads-up that My Cut Search is celebrating their one-year blogiversary this week.  Later this week, they will be offering special promo codes in their "News" section.  My Cut Search is a great way to find specific Cricut cuts.  Be sure to check it out!)
36

Elephant Crossing Guard

Monday, July 11, 2011
It's time for another Monday challenge at My Craft Spot.  For those of you who have been followers for awhile, you know that each summer and Christmas, I make a card for my youngest son's crossing guard and always include a stop sign.  Lynn tells me that she keeps and displays them all!  This is the card I made for this end-of-year celebration.

The challenge this week at My Craft Spot is "Ink it Up" - so I did lots of inking around the edges.  Most of the card was made with scraps, with the exception of the kraft card base.  I created the card by welding together two of the flower image from Plantin' SchoolBook using my Gypsy.  (One was flipped.)  The blue mat is part of the same image and I embossed it using the Polka Dots folder through my Cuttlebug.  The elephant is from Paisley and the STOP sign is from Going Places.  I welded a handle to the sign using George and Basic Shapes and added a gem for the flashing red light.  I did some doodling and added Glossy Accents to the sunglasses.  I also added a "Hip Hip Hooray" sentiment from My Craft Spot's Sweet Sentiments #2.  The sentiment is perfect for end of school (and start of summer holidays)!  To finish things off, I added some sky blue crinkle ribbon and red baker's twine - both from My Craft Spot.

Please head over to My Craft Spot to see the rest of the design team inspiration - and to link up your own "Ink it Up" project!


(I'm still up to my eyeballs in readings, research, papers and presentations.  This month will continue to be incredibly busy and I look forward to visiting your blogs as I am able.)
21

Canada Day Card

Monday, June 27, 2011
This week's challenge at Fantabulous Cricut is "July 4th" - use red, white, and blue on your project.  As Canada Day is on July 1st - and because I am a proud Canadian - I made a fun card to celebrate our nation's birthday.  
I was so excited to use my new Campin' Critters cartridge on this card!  (My husband bought it for me.  How I love that man!)  Campin' Critters was used to cut the beaver and tree.  I wasn't keen on the teeth so I cut the piece in two.  I'm also really not keen on the mismatched eyes, so I punched a set myself.  I manipulated a Plantin SchoolBook number sign for the tail and also added a maple leaf from Create a Critter on the cap.  The little tuft of grass is also from Create a Critter.  The dirt path is actually the sweet pea from New Arrival!  The red sign is cut from George and Basic Shapes, as is the heart, and the letters are from Pooh Font Set.  I added some doodling, lots of ink and also some Glossy Accents to the nose and eyes.  The log was run through the Cuttlebug using Distressed Stripes.   (The beaver and maple leaf are national symbols of Canada.)

Now it's your turn!  Head over to Fantabulous Cricut to check out the rest of the design team inspiration.  There are wonderful creations full of national pride!  Then link up your own red, white and blue project - and feel free to celebrate your country, wherever you are!

*I am linking this card at Sentimental Sundays where this week's challenge is to be patriotic and use the colours of your nation's flag and at My Sheri Cards for the Canada Day/Independence Day challenge. I am also going to enter this in the Cricut Circle's Patriotic Pride challenge.

Also, EVERYBODY is invited to celebrate Canada Day with me this Friday.  I've been asked to join a very talented group of Canadian bloggers and we've got an amazing Canada Day blog hop lined up, starting bright and early on the east coast.  There is a fantastic list of prizes being offered too - just for joining the fun!  I'll be offering my own prize here at Small Bits of Paper as well!
29

Crinkle Ribbon from Kimberly Tracy at My Craft Spot

Sunday, February 27, 2011
A few of the members of the Fantabulous Cricut Challenge Blog Design Team were most generously given some gorgeous crinkle ribbon from My Craft Spot's Kimberly Tracy - and challenged to use the ribbon in our creations.  I received the Neapolitan set which contains Chocolate Truffle, Vanilla Bean, and Raspberry Truffle.  This ribbon is absolutely gorgeous and I am in love with it!  In fact, after my first crinkle ribbon creation, I headed over to My Craft Spot and put in an order for more, this time selecting the Springtime package.  Kimberly shipped it immediately so I am hoping it will arrive soon.  I've got some ideas!
For this Easter card, I used Easter 2010 to cut the layers of the egg.  I used a Fiskars corner punch and also used a Cuttlebug border folder to create the embossed frame for my sentiment (which is from My Creative Time's Color Me Happy set).  I used my Raspberry Truffle crinkle ribbon around the egg and then used a bit more to tie a bow.  I inked the edges of my card and added a couple of brown pearls to finish things off.  I love the contrast of the ribbon against the kraft paper and the ribbon really draws out the pink in the egg too.
I made this next card for my husband.  Each year, I like to give him a St. Patrick's Day themed card on March 15, the anniversary of the day we first met (22 years ago!).  I used Paper Doll Dress Up for the shamrock and the hearts on it.  (I cut the shamrock in a darker shade of green and hand cut the image to create three hearts to fit inside the shamrock.)  The border was created by welding the shamrock border from PDDU with a holed border from Holiday Cakes.  The tag was cut from Plantin' Schoolbook.  I embossed the background with a Cuttlebug Distressed Stripes folder.  The tag was stamped with a sentiment from My Creative Time's I Believe in Leprechauns set, using both Versamark and then Chocolate Chip ink.  I wove some Chocolate Truffle crinkle ribbon through the holed border and tied a bow as well.  I also added some of the crinkle ribbon to the tag.
I created this shaped card with Accent Essentials.  The little frame was cut with Ashlyn's Alphabet and stamped with a clear stamp (maker unknown).  I embossed the DCWV pink patterned paper with a Cuttlebug Textile Texture folder.  I also added a punched border created with an EK Success punch.  I used Vanilla Bean crinkle ribbon around the mat and to create a double bow.  I finished things off with a button and pink pearls. 

There are more My Craft Spot crinkle ribbon creations to be seen at Fantabulous Cricut.  Please be sure to check them out - and then head over to My Craft Spot to check out the wonderful ribbon colours!  Each package comes with 3 yards (2.74m) of each of 3 colours for just $9.99US - which includes free shipping, even to Canada!
24

Compass Valentine

Monday, January 24, 2011
This week at Fantabulous Cricut, we are challenging you to make use of your neglected cartridges.  I have a few cartridges that are still in their original packaging and (as I've mentioned before) one of my goals this year is to use what I've got.  However, for this challenge, I opted to go with My World - a cartridge that has been opened but used only once and is not yet on my sidebar's labels list.  Papers are designer cardstock from a set I got at Costco, a piece from Michaels' open stock, and metallic silver cardstock. 
(Sorry for the bit of glare.  The compass was SO difficult to photograph.)
I made this card for my husband.  I used My World to cut the compass.  I cut the shadow and two cuts of the main image using the blackout feature.  Then, on another layer, I hid the contours for the outer cuts and used a gel pen holder in my Cricut to draw the face of the compass.  I was a bit disappointed, and had to do this five times - still with rather unsatisfactory results as most contours were not being drawn.  I tried a number of different methods and finally ended up hand-drawing a good portion of the compass' face.  However, with all the inking on the card, I decided that the uneven lines added to the charm of the overall look.

I also cut a circle silhouette from George and Basic Shapes using the same metallic cardstock which I had used for the shadow.  I cut a full circle out of transparency too.  These were positioned over the top layer of the compass to give it the look of a glass cover.  I adhered these with small little pop dots.  The needle of the compass was cut from Gypsy Wanderings and I used markers and ink to colour a tiny brad to match.  I am so pleased with how the compass turned out!

I cut the heart and its shadow from a single piece of designer cardstock using George and Basic shapes and inked the edges to give some separation.  After adhering the heart to its shadow, I ran it through the Cuttlebug using the script embossing folder.  I did a bit more inking over the embossed script as well.

I also cut N, E, S, and W to use in the corners of the card and cut them from the same designer cardstock I had used for the compass needle and heart.  These were cut from Plantin' Schoolbook and were inked.  Initially, I had the N in the top left corner but then remembered my days of orienteering back at summer camp and realized that the needle of a compass always points north!  As the needle is pointing to the heart, I quickly changed things to make sure everything was just right.
I added a little heart charm tied to black hemp and positioned it behind the compass.  A few silver gems were also added to finish off the card.

For the inside of the card, I created the sentiment in Microsoft Word.  I did a bit of inking on the paper and finished things off by added some photo corners punched with an EK Success punch.
Head over to Fantabulous Cricut and show us what you can do with those dusty cartridges! I would love to see what you can create!

Challenges:
Crop Stop: square with a die cut
Frosted Designs: use transparency
***I'm also entering this at Sweet Magnolia Rose's first blog hop challenge.  Anything goes! Head on over and enter your project too!*** 
36

Happy First Birthday Card

Friday, September 17, 2010
I haven't entered a challenge in ages and decided to do just that today.  I took the day off and did lots of crafting - some ATCs and some cards.  My nephew is turning one soon (I can't believe it!) and I wanted to make him a card.  Emma from My Creative Time also has a challenge out to use an older cartridge for a card (or layout).  I was playing around in Design Studio, looking at various modes of transportation and as soon as I saw the train on New Arrival, I knew that was exactly what I wanted to use!
I cut the train at 2 1/2 inches - cutting various layers in different colours.  I used Plantin Schoolbook for the number one, but manipulated it a bit in Design Studio to get the size I wanted.  I also used George and Basic Shapes to recreate the wheels - and created wheels for the shadow of the number one as well.

Yesterday, I learned of a great tip for making glitter paste from Linda at The Paper Boutique.  You can watch her video tutorial here.  In fact, she's got a number of great tutorials on her YouTube channel.  I followed her directions for glitter paste and used it for the number one.  I also added regular glitter glue to some other aspects of the train. 
I used an EK Success border punch for the grass (which I then ran through my Cuttlebug) and another EK Success punch for the photo corners.  Yet another EK Success punch was used for the little cupcakes which I placed on the train's cars.  I also used a Sizzix embossing folder on the two cars.  I felt that the engine needed something more, so I used a bit of matching cardstock, cut it to size, glittered it, and then glued it on.  Lots of the card's parts are popped too.

(By the way, if you have not yet participated in the Fantabulous Cricut Button Up for School Blog Crawl, there is still time!  I'm giving away a Stampin' Up Stamp Set on my post, so be sure to enter if you haven't already.  You have until Saturday night at midnight.)
16

Canada Day Card

Thursday, June 24, 2010
With Canada Day (July 1) just around the corner, I've been working hard on a project for next week's Canada Day Blog Hop.  I am delighted that I was asked to join a group of Canadian crafters to be part of the hop.  Of course, we're Canadian so everybody is invited!!  No matter where you are from, be sure to pop back here on Canada Day for all the details and links.  We'll be showcasing our Canada Day work - and some of us (like me!) will even be offering a little giveaway.  Heather at Princess' Paper Projects is putting it all together.  You'll want to start with her blog - but of course I'll have all the links for you here too.  See you then!

In the meantime, I have also been working on some other activities.  I made this Canada Day Card to give as a thank you to my sister and her girls.  We will spend Canada Day with them, enjoying their food, drinks, and company!  Each year is such a delight - and I'm sure that this Canada Day will be no different.
To make this card, I used Plantin' SchoolBook for both of the fonts and Create a Critter for the beaver and maple leaves.  I felt the beaver needed a bit more, so I made him a she-beaver and added a hair bow.  I used a glitter gel pen on the lettering, and embossed the background with my Cuttlebug. Most items on the card are flat, but the "eh!" is partially glued to Madame Beaver and partially popped.  C'est tout!

On a different note, Sammye Jo at 62 Cards has started a new blog called My Insanely Sweet Life.  She's looking for followers - and has a gift certificate to tempt us all!! What's to lose?

Also, Chris at Turned Gypsy is also offering a $50 gift certificate to CSN at her blog.  I'm taking the bait!!

Don't forget to come back on Canada Day (July 1) for our Canada Day Blog Hop!

Challenges entered with my Canada Day card:
Little Red Wagon - Canada Day projects
Made by Momo - Spots and Dots challenge
My Sheri Crafts - Patriotic creations
15

A Round of HIGH low ~ a layout

Tuesday, June 22, 2010
I am big on family dinners so each night we eat together at the table. We also have a game that we play as we eat: HIGH low. It’s a great way to share the events of the day and to regroup as a family each evening. We go around and list the high points of the day. We can list as many as we wish, but it’s mandatory to have at least one high. Even if we’ve had a bad day, there is something for which we can be thankful. We also have the option of giving a low. We are only permitted to share one low though as mealtimes are not to be grumbling sessions! We enjoy this time together and learn things about each other’s lives that we might have missed out on otherwise.

This week at Serenity Scrappers, the challenge was to create a round layout showcasing the family at mealtimes. All my other layouts are square so I just had to create my round layout on a square background. I incorporated a number of round elements into the layout. The papers are all from We R Memory Keepers. I found them on clearance at Michaels for just 20₵ a sheet – making this the most inexpensive layout I’ve ever created as I did the entire thing using only three sheets of paper. One page had 4 6x6 different coordinating patterns on the back so I was able to have a lot of colour and design choice. I thought the circles on the background paper would be perfect with the round theme and I loved the main round image with the circles at the end of each spoke, an image from Accent Essentials. Using Design Studio, I hid the contour for the inner circle and cut it separately on red. That way, I could shift it up to sit behind the photo, which I did not wish to have in the centre of the page. I also embossed the red circle with Swiss Dots. Most arrows were cut from Accent Essentials but the cornered arrow is from Home Decor. I embossed the inner arrows with my Cuttlebug. The date and HIGH were cut from Plantin SchoolBook and low from Printing 101. I added some white pen dots to the lettering. I printed the rules and just cut the paper with my trimmer and used an EK Success border punch on the left side. I used a Creative Memories corner rounder on the right-side corners. I cut a slightly larger bit of paper for behind the rules and also rounded the corners on the right. I ran the paper through my Cuttlebug with a dot border folder. The bottom centre of the page has paper and dots to represent our family at the table – a father, a mother, two boys and a girl. I punched the circles with a little circle punch.

I had fun with this layout. It came together so easily and I was never worried about messing up with the paper!! It’s bright and fun – just like our mealtimes.

I’ll submit this at Serenity Scrappers. The challenge is open until June 25 so you still have time to enter too! Kel provided a sketch if you need some more inspiration.
15
Former Design Team Member at My Craft Spot (2011-2015)
My Craft Spot


Powered by Blogger.
Follow on Bloglovin

Followers

>