Rudolph the red-nosed reindeer

Tuesday, December 23, 2014

Only two days until Christmas! Are you ready? I've still got some of my last minute baking and food preparations to get ready so they're fresh for Christmas Day, but otherwise, I'm all set! My daughter is home and we've got a Wasgij (reverse perspective puzzle) on the go. I love setting out puzzles during family holidays as it's a wonderful way to connect at different times of the day. One of us will see another working on the puzzle and join in for a bit. It makes me happy to spend the time together having fun with my favourite people in this world. 


I'm sharing a fun card over at My Craft Spot today. I started by cutting the base and mats for my 4x4 card. Before embossing the white mat, I stamped it with a little sentiment from the Tiny Tags Christmas set. The Sizzix snowflake folder is perfect to use with the Tiny Tags stamps as the sentiments fit inside the largest snowflake. Once the mats were ready to go, I assembled the sweet little reindeer from Miss Kate Cuttables (with enamel dots for his eyes) and popped him on the card. I purposefully made the base a bit smaller than the lights as I wanted them to extend off the card. This was quick and easy to put together - a perfect project for this busy time of year!


Don't forget about the 12 Deals of Christmas going on at My Craft Spot. Check out the latest deal HERE!

I hope you all have a very Merry Christmas!! xox

7

Guest Designer at Die Cuttin' Divas

Tuesday, December 16, 2014

I'm so delighted to be a guest designer for this week's Die Cuttin' Divas challenge! The challenge this week is to create a project inspired by a Christmas song. When I saw the caroling reindeer (#71358) singing the line "Fa la la la la" from Deck the Halls, I knew it was the image for me!


After cutting my card base, I cut a red mat and a slightly smaller white mat to go on top. I embossed the white mat with a Cuttlebug snowflakes folder. I switched the "Fa la la la la" from the original as I wanted an extra "la" and a different font. I also decided to emboss the green wall behind which the reindeer are singing with a Tiny Bubbles folder. I popped the diecut on the front of my card.


I then carried the "Deck the Halls" theme into my card by stamping "'Tis the season to be jolly" from My Craft Spot's 'Tis the Season stamp set. 

Please head over to Die Cuttin' Divas Challenge Blog to see what the rest of the designers have created. You can link up your own creation too!

Thanks, Die Cuttin' Divas, for letting me be your guest designer this week! It's such a treat to join you!


Don't forget about the 12 Deals of Christmas over at My Craft Spot! 

 
Each day until Christmas Eve (excluding Sundays), Kimberly will post a new 'deal of the day' for you to 'unwrap' - with something new each day!

http://mycraftspotshop.com/catalog.php?category=44


Larger Image

Click HERE to see all of the Jute Twine at My Craft Spot.

Check out the Deals still going on from Day #1 and Day#2 and Day#3 and Day #4 and Day #5 and Day #6 !


13

Santa Gift Bag

Monday, December 15, 2014

I can't believe that Christmas is coming so quickly! This week will be crazy for me as I'm working full time and also have a set of papers coming in from my part-time teaching job. I've got a number of students who submitted early so I've been grading papers as they come in - but I want everything finished up as soon as possible. My goal is to have everything done by the weekend so I can enjoy the holidays. I've taken next week (Monday to Wednesday) off and the college is closed until January 5 so I'm ecstatic to have two full weeks with my family. My daughter will be home on Sunday too and I can't wait to have the family all together again.


This week at My Craft Spot, our challenge is "Bags and Boxes". I found a fun little Santa gift bag at the Silhouette Store (#52102) and decided it would be great for a gift card and a little something sweet. 


Before assembling the box, I embossed the white and red cardstock with a few different embossing folders. I then cut a tag from the Tiny Banners and Toppers metal dies and stamped it with a "From the North Pole" sentiment from the Tiny Tags Christmas stamp set.


I finished everything off with a triple bow created with Traditional Red baker's twine.

Please head over to My Craft Spot to see the rest of the "Bags and Boxes" creations and to link up your own project for your chance to win this week's prize of a gift certificate to the My Craft Spot Shop. Don't forget about the 12 Deals of Christmas fun over at My Craft Spot too! Now's the time to give Santa a hand in getting you the supplies you've been wanting! 

 
Each day until Christmas Eve (excluding Sundays), Kimberly will post a new 'deal of the day' for you to 'unwrap' - with something new each day!

http://mycraftspotshop.com/catalog.php?category=44


Click HERE to see all of the Stamps at My Craft Spot.

Check out the Deals still going on from Day #1 and Day#2 and Day#3 and Day #4 and Day #5 !


6

You're not old!

Saturday, December 13, 2014

Happy Saturday! I'm sharing a project over at My Craft Spot today and am posting it here on my blog too. My sister celebrated her birthday a couple of days ago and this is the card that I created for her. We have a bit of joke between us which started when we took a trip to Egypt together years ago. I kept giving her all my things to hold so I could take photos and she ended up carrying my things all over. She asked if I thought she was my camel (as there are lots of camels carrying things in Egypt) and I started calling her Kami (as a nickname for "camel"). It stuck! Now, I always try to get her camel-themed cards and gifts. Camel cards are made easier with my Silhouette!!


The camel itself is a file I found at the Silhouette store (#5628). After cutting and assembling her, I popped her onto the background I created with some patterned paper and borders cut using the Fancy Edges 2 metal die set. I then stamped a sentiment from the Birthday Wishes set onto my banner, which was created using the Ribbon Banners - Straight metal dies. I used some enamel dots for my camel's eyes and on the banner too.


I used more Birthday Wishes sentiments for the inside of my card, and also decorated it with some patterned paper and a Fancy Edges 2 border.

Thanks so much for visiting today! Have a wonderful weekend!

5

Happy Winter

Saturday, December 6, 2014

It's the weekend!! Life continues to be incredibly busy here. Only two more weeks before my holidays begin and yes, I AM counting! I'm spending the day with my husband, shopping in Toronto. Hopefully, we finish things up. I basically need stocking stuffers and a couple of things for the boys. Plus, I'm on the hunt for an ugly Christmas sweater for a party next Friday.


I'm sharing a fun little project over at My Craft Spot today. I made this quick set of cards to tuck in with little thank you gifts this season. The sweet little snowman is from the Jar Full of Christmas stamp set. Before stamping, I imported the image into my Silhouette software and created an offset for the shape. Once cut, I used my Stampin' Up Stamp-a-ma-jig to position the stamp. After colouring the noses and arms, I added little bows made with traditional red baker's twine. Each snowman is popped on his 3x4 card.


The banner at the bottom of my cards was cut from the Ribbon Banners - Straight metal dies and stamped with a sentiment from Think Snow. I also added a little silver snowflake, created with Small Alphabet metal dies, to each card.

Thanks so much for visiting today. Have a FANTASTIC weekend!

 .
7

Hope Your Birthday is Filled with FUN!

Monday, December 1, 2014

Happy December!! The time has been flying so quickly and I've got a list of things that I still need to do before Christmas. Yesterday was a busy day as it was my husband's birthday. We also took time to put up the Christmas tree. Generally, I'm pretty strict about no Christmas decorations going up before December, but I figured it was close enough.


This week at My Craft Spot, we are challenging you to make the sentiment the focal point of your project. As I needed another card for my husband, I decided to make a birthday card using one of My Craft Spot's Chalkboard Sentiments stamps as my focal point and stamped it using a few different colours. The sentiment mat was just a regular rectangle so I used my Stampin' Up Ticket Corners punch to jazz things up a bit. The fun little pennants were made with Tiny Banners and Toppers metal dies and each one was embossed with a different folder. The green border was created with one of the Fancy Edges metal dies and I used Ribbon Banners - Straight for the banner along the bottom. I also added some traditional red baker's twine to the ribbon banner. The white mat and ribbon banner were also embossed, each with a different circle-themed folder.


I finished everything off with a few fun Toadally Green sequins. This card was fairly quick to put together and ended up so bright and fun - perfect for a birthday!

Please head over to My Craft Spot to see what the rest of the design team has created - and then link up your own project with a sentiment as the focal point for your chance to win a gift certificate to the My Craft Spot Shop.

Have an amazing day!!

7

Black Friday Sale at My Craft Spot!

Thursday, November 27, 2014

http://mycraftspotshop.com?code=MCSBLACK

Click HERE to go shopping!

 You must enter through the above link to get this discount or enter the following html in your browser:  

http://mycraftspotshop.com?code=MCSBLACK


Click HERE to go shopping!


0

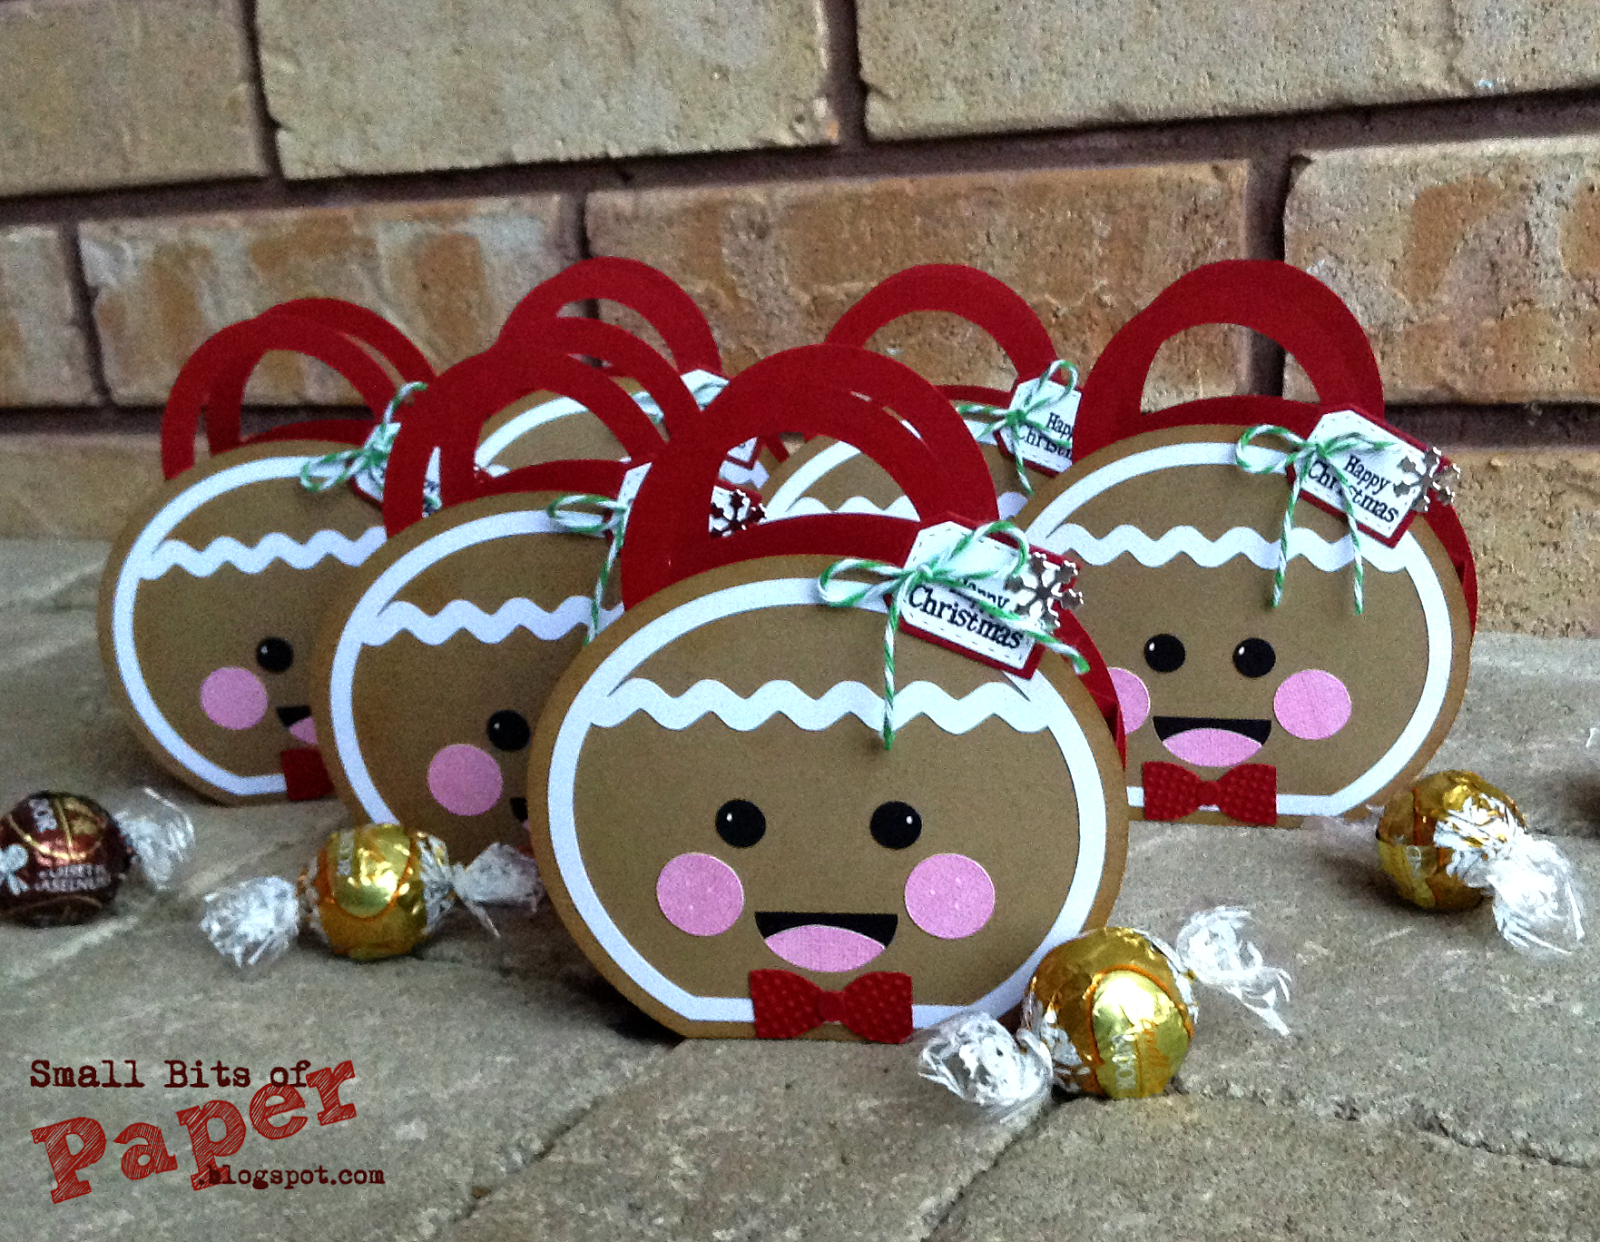
Gingerbread Head Christmas Treat Bags

Monday, November 17, 2014

I should not have made a comment about life settling a bit two weeks ago, as things got quite hectic after that!! I had a few unexpected events arise (nothing serious at all, but just the sort of things that altered my plans). One of those events was a trip to visit my daughter at uni. Her computer was on its last legs and then she spilled tea on the keyboard. I'd planned to get her a new laptop for Christmas so decided to head to visit her on the weekend to give her an early present. It was such a treat to see her and spend the day together. On our way home, my husband and I stopped in Toronto to see the Raptors play the Utah Jazz (basketball). We had an amazing time together, but now I'm feeling even further behind!! (It was worth it.)


With family, work, essays to grade and visits to my mum (and daughter!), I haven't done any crafting since my last project two weeks ago. It was nice to get back into my craft room to create. This week's challenge at My Craft Spot is 3-D Christmas. I saw some cute little bags at SVG Cutting Files and thought they'd be fun to make AND give away! I switched things up a bit as I don't care much for the "hair" on the boy file - but that's one of the joys of SVGs and personalizing cuts.


I used my Silhouette to cut the pieces and embossed the little bowties. After assembling the bags (six of them!), I used Tiny Tags metal dies for the little tags. Each one is stamped with the "Happy Christmas" sentiment from the NEW Tiny Tags Christmas stamp set. I also added a silver star to each. I used Small Alphabet metal dies to cut the stars. I finished everything off with some Green Twist baker's twine.

Please head over to My Craft Spot to see the other lovely 3-D Christmas projects that my design team sisters have made. Plus, be sure to link up your own project for a chance to win this week's $10US gift certificate to the My Craft Spot Shop.

Have a fabulous week!


10

Christmas Card - "Use Metal"

Monday, November 3, 2014

Life is settling a bit. My mum is home and getting stronger each day following her heart surgery last month. She lives quite close so I'm able to pop by when she needs help. Thanks so much to those of you who have been asking about things.


This week at My Craft Spot, we are challenging you to use metal (real or faux) on your creations. I decided to use some of my red and silver metallic cardstock to create a Christmas card. I cut a metallic red mat and also cut some Christmas designer paper for my background. I then used the Small Alphabet metal dies to cut out my sentiment, using the same metallic red cardstock as I used for the mat. The colours likely look different due to my incredibly limited photography skills!!


Using a variety of metal dies - Tiny Doilies 2Small Alphabet and Snowflake Border, I cut some snowflakes out of metallic silver cardstock. For an extra splash of colour, I added a red gem to the centre of each. The large, layered snowflake is popped for added dimension.

Please head over to My Craft Spot to see the rest of the design team creations - and don't forget to use metal on your own project this week in order to link up to be eligible for this week's gift certificate to the My Craft Spot Shop!!

Have a wonderful day!
8

My Craft Spot Halloween Sale!!

Friday, October 31, 2014

http://mycraftspotshop.com/catalog.php?category=69

Click HERE to go shopping!


0

My Craft Spot Christmas Stamp Release Blog Hop Winner!!

Monday, October 27, 2014


Thanks to all of you who left such lovely comments for me last week during the My Craft Spot Christmas Stamp Release. It was a treat each day to read such kind words. The winner of the $10US gift certificate to the My Craft Spot Shop is #25, Pam from Scrap-n-Sew Granny!! Congratulations Pam!!! Please contact me at smallbitsofpaper at hotmail.com with your contact information so I can arrange to get your gift certificate to you. Happy shopping!!  
4

My Craft Spot Christmas Stamp Release Blog Hop

Saturday, October 25, 2014

It's the My Craft Spot Christmas stamp release blog hop!! All week long, we've been sharing sneak peeks of projects created with the FIVE new stamp sets NEW SVG files. Today, you can see the full reveal. Plus, everything is available for purchase too!


For my project, I created a card using the NEW Shaker Ornament 2 SVG file. I cut the backing in white and heat embossed the Peace & Joy sentiment from the NEW O Holy Night stamp set. The window was cut 7 times, with a transparency between the top two layers. This way, I could add some wonderful Berry Red and Snow Flurries sequins in my shaker ornament. 


If you look closely at the red portion of the ornament, you will notice that it is also stamped with Peace & Joy - only smaller! The same sentiment is on the NEW Tiny Tags Christmas stamp set, in miniature. I used VersaMark for a subtle pattern. The pretty silver borders on my card were cut with one of the Fancy Edges metal dies. I finished things off with some thin silver string and some gems. Thanks to the NEW My Craft Spot SVG and sentiments, this card was quick to put together and yet still looks wonderfully Christmassy!

http://mycraftspotshop.com/

Kimberly is very generously giving a $10US gift certificate for the My Craft Spot Shop to be won at EACH stop along the way. All you need to do is leave a comment on this post for a chance to with the certificate from my blog. I will announce the winner on Monday.

Here's a picture of all the NEW stamps!! (Click the picture to enlarge it.)


And if you click the logo, you can go and check out all the NEW SVG files!

http://svgcutfiles.com/


It's now time to visit the amazingly talented Deb's blog, Craftin' Chaos. Here's the full lineup for you too:

Enjoy your weekend!!

42

My Craft Spot Christmas Stamp Release Party - Day 5

Friday, October 24, 2014

It's the last day of the My Craft Spot Christmas stamp release party sneak peeks - although we're not ready to end the fun quite yet. Tomorrow, we'll celebrate the full reveal of the FIVE NEW stamp sets (and some NEW SVG files too) with a blog hop - including prizes at EACH stop along the way!
Everything will be available for purchase too.

Today we are sharing projects created with the NEW Merry & Bright  stamp set. This set has a variety of sentiments to meet your Christmas creating needs.


For my project, I used the NEW Curvy Box SVG file from My Craft Spot. Don't you just love the fun shape?! Once assembled, I imported the sentiment from the NEW Merry & Bright stamp set into my Cameo software and traced around it, also creating an offset shadow. Once cut, I stamped and embossed the sentiment. I used some wonderful solid and striped baker's twine and a few little bells to decorate my box too.

Please head over to My Craft Spot to see the rest of the Merry & Bright projects. Plus, leave a comment for Kimberly for your chance to a $10US gift certificate to the My Craft Spot Shop!

See you tomorrow for the blog hop!!
11

My Craft Spot Christmas Stamp Release Party - Day 4

Thursday, October 23, 2014

It's Day Four of the My Craft Spot Christmas stamp release party and today we are sharing projects created with the NEW Christmas Chalkboard  stamp set. This set is full of beautiful sentiments for the Christmas season, all of which can be used to achieve the chalkboard look on your projects. All week long, we're sharing creations made with one of the FIVE new stamp sets (and some NEW SVG files too)! Everything will be available for purchase on Saturday. Be sure to hop along in our blog hop over the weekend for your chance to win a gift certificate to the My Craft Spot Shop.


As soon as I saw the NEW Christmas Chalkboard stamps, I knew that my first creation using this set would be "O Come Let Us Adore Him". I was delighted to find My Scrap Chick's Nativity set with shepherds and sheep as the images were just what I had in mind to go with the sentiment. After cutting, inking and assembling the sweet characters, I layered them (with the little lamb popped) over some starry night paper and ground which was created using Fancy Edges metal dies.


After stamping my sentiment on some blue vellum, I cut it out using a Scrapping Life Cards metal die. They look like they were meant to go together! I then added a wee star cut from Small Alphabet metal dies. I just love the way the little shepherd and his precious lamb are looking up at the star and realizing its incredible significance as they journey forward to welcome the newborn king. 

Please remember to visit My Craft Spot today. The rest of the design team has created some wonderful projects to showcase today's NEW Christmas Chalkboard stamp set. Don't forget to leave a comment for Kimberly for your chance to win today's prize: a $10US gift certificate to the My Craft Spot Shop!

Have an amazing day!
16

My Craft Spot Christmas Stamp Release Party - Day 3

Wednesday, October 22, 2014

It's Day Three of the My Craft Spot Christmas stamp release party and today we are sharing projects created with the NEW Tiny Tags Christmas stamp set. This set contains LOTS of little sentiments that all coordinate perfectly with the Tiny Tags metal dies (and can be used without too). All week long, we're sharing creations made with one of the FIVE new stamp sets (and some NEW SVG files too)! Everything will be available for purchase on Saturday. Be sure to hop along in our blog hop over the weekend for your chance to win a gift certificate to the My Craft Spot Shop.


For my project, I decided to create a set of little 3x3 Santa cards. I love this fun face file I found at My Scrap Chick!  Isn't he cute?! After cutting all the pieces, I embossed Santa's hat, mustache and beard and inked the nose a bit before assembling him.


I used Tiny Banners and Toppers for my sentiment, and used one of the NEW Tiny Tags Christmas stamps. Ho Ho Ho is just perfect my jolly little Santa cards!

If you haven't been by already, please check things out at My Craft Spot to see all the projects created by the rest of the design team. While you are there, leave a comment for Kimberly for your chance to win a $10US gift certificate to the My Craft Spot Shop.
19

My Craft Spot Christmas Stamp Release Party - Day 2

Tuesday, October 21, 2014

It's Day Two of the My Craft Spot Christmas stamp release party and today we are sharing projects created with the NEW O Holy Night stamp set. This set contains a variety of beautiful sentiments. I decided to take one and add a bit of whimsy to it. All week long, we're sharing creations made with one of the FIVE new stamp sets (and some NEW SVG files too)! Everything will be available for purchase on Saturday. Be sure to hop along in our blog hop over the weekend for your chance to win a gift certificate to the My Craft Spot Shop.


This hot cocoa pouch was created with a cut file from My Scrap Chick. (I only realized as I was writing up this post that the paper for the mug is upside-down!! Oops!!) After everything was inked and assembled, I stamped a sentiment from the NEW O Holy Night set onto the speech bubble (which came with the cut file). After that, all I needed to do was add the hot chocolate pouch! I'm hoping to make some more of these as little gifts to give over the holidays.


Be sure to head over to My Craft Spot to see the rest of the design team creations. They're amazing!! And, while you're there, leave a comment for Kimberly for your chance to win a gift certificate to the My Craft Spot Shop.
16

My Craft Spot Christmas Stamp Release Party - Day 1

Monday, October 20, 2014

Welcome to Day One of the My Craft Spot Christmas stamp release party! All week long, we'll be showcasing projects created with the amazing FIVE new stamp sets and there will also be some SVG files too! We'll end things with a bang with a blog hop on Saturday - with prizes at each stop along the way!! Plus, all the fabulous NEW products will be available for purchase on Saturday too. Woohoo!


For my project, I created a little treat box and filled it with truffles. Yum! After securing the box with some lovely Olive Green crinkle ribbon, I then cut one of the NEW Chalkboard Frames - Fancy SVG files. I used Glossy Accents for the red flourishes on he sides. I used a sentiment from the NEW Naughty or Nice stamp set and heat embossed it in silver. Truffles are my kind of coal!

Please head over to My Craft Spot to see the rest of the projects created with the NEW Naughty or Nice stamp set. While you're there, don't forget to leave a comment for Kimberly for your chance to win a gift certificate to the My Craft Spot Shop!!

See you tomorrow! 

18

The Party Starts Tomorrow!

Sunday, October 19, 2014

The My Craft Spot design team is all ready for the Christmas stamp release!. Be sure to visit tomorrow for daily fun. Each day, we'll be showcasing projects created with the Join us next week as we showcase FIVE new stamp sets and... some SVG files too! Kimberly will be giving away a My Craft Spot Shop gift certificate each day and we'll end with a blog hop on Saturday - with prizes at each stop along the way!!

Here are some sneak peeks to entice you:


See you tomorrow!

PS Thanks to those of you who said prayers for my mum last week. Surgery went well. Mum is still in ICU but recovering. And I finally slept through the night again!!
1

Christmas Stamp Release at My Craft Spot!

Wednesday, October 15, 2014

Have you heard the news?!  My Craft Spot is getting ready for the Christmas stamp release! Join us next week as we showcase FIVE new stamp sets and... some SVG files too! There will be sneak peeks all week long and a blog hop on Saturday - with prizes at each stop along the way!!


(For those of you who say prayers, my mum is undergoing a mitral valve replacement tomorrow. I'll be taking her to Toronto this evening and staying with her through the surgery. We would appreciate your thoughts and prayers. Thank you!!)
5

Pumpkin Box

Monday, October 6, 2014

Happy Monday! It's time for another challenge over at My Craft Spot and this week is all about Trick or Treat. When I saw the cute pumpkin box cut at My Scrap Chick, I just couldn't wait to make it!


After cutting my pumpkin, I inked the edges and ran it through the Cuttlebug. I'm addicted to texture!! I loved how quickly everything went together! I decided to dress things up a bit and that's where the wonderful products from My Craft Spot came into play. 


I layered some Tiny Doilies and stamped the top ring with a sentiment from Stamping All Around Fall. In the middle, I popped a spider cut with the newly released Halloween Shapes metal dies. The Happy Halloween sentiment was cut using Fancy Edges - Halloween metal dies. I decided to add a little ghost too. It was also cut with one of the Halloween Shapes metal dies.


What's a Trick or Treat box without treat? I had purchased a huge bin of Halloween jubes last week and fortunately, there were some left for my project!! I filled a bag and then tied it with some fun Halloween baker's twine.

There are more projects to see over at My Craft Spot. Please head over to check them out - and to link up your own Trick or Treat project for a chance to win this week's gift certificate to the My Craft Spot Shop.

Have a fabulous day!!    
6
Former Design Team Member at My Craft Spot (2011-2015)
My Craft Spot


Powered by Blogger.
Follow on Bloglovin

Followers

>