Small Bits of Paper: Walk in my Garden

Showing posts with label Walk in my Garden. Show all posts

Bee Happy!

Thursday, February 28, 2013
Today I have a "springy" card to show you.  (I'm sharing it at My Craft Spot too!)  Here in my part of Canada, we've had a very snowy February and I am more than ready for spring!  In fact, we had another huge dumping yesterday.  The only good thing about our weather is all the unexpected "snow days" (days off due to all the snow)!


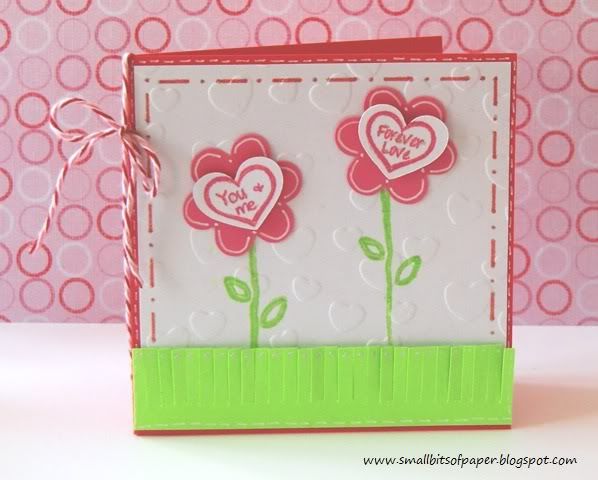
I created my card using my new embossing folder from Stampin' Up. (I'm linking this to Little Scrap Piece's Emboss It Challenge.)  Using my Gypsy, I resized some little hexigons from Accent Essentials to fit the embossed centers of my mat.  I used several pieces of scrap paper to vary the colours and patterns. I also used Accent Essentials to create the little border at the side of my card and then handstitched the zigzag in blue, using We R Memory Keepers Sew Easy kit to create the pattern.


The little sentiment tag was handcut (using a square punch on the diagonal for the pennant end).  I stamped the tag with a fun sentiment from My Craft Spot's Sweet Sentiments - Set #2. My little bee is from Walk in my Garden. I popped the sentiment tag and bee onto my card to add even more dimension. Tim Holtz distress ink was used on all papers of my card.

Don't forget that this week's challenge at 
My Craft Spot is "Pop it up!" You have until Monday to link up your own project to be eligible to win this week's prize - a New Arrival stamp set.

Have a fantastic day!


17

ConMACulations!

Monday, May 21, 2012
Yikes!  I'm so sorry that this is posted late today.  I've been having technical difficulties over the past week which have since resulted in a new laptop and a new mobile!  My other laptop is less than 2 years old - with a 3 year warranty - but I gave up completely with Dell as they have been nothing but a headache since they got my money.  I'm supposed to have "next business day in home service" but usually have to wait 2-3 weeks for service and that just doesn't cut it with my work!  After the sixth time of needing to do a total restore, I decided to move on, count my losses and make a reliable purchase - and spread the word to avoid Dell like the plague!! 


This week is all about congratulations at My Craft Spot.  This is perfect timing as  I DO have wonderful news to share!  My daughter received early acceptance to McMaster University (aka Mac) a couple of months ago and, after weighing her options, she made the decision to accept the offer this past week.  My husband and I celebrated by taking Erin out for dinner and I made this card to show her how very proud we are of her.


I used Kate's ABCs and Cuttin' Up for the font.  The little flower is from Walk in My Garden and some punches.  The fabulous sentiment is from My Craft Spot's Friends and Neighbors - Inside and Out set.  I stitched around the My Mind's Eye paper and inked everything!  I also used my edge distresser around the mat.  I finished things off with a pearl and some vintage blue twine - also from My Craft Spot

This week is another hectic one for me but I'm hoping to save some time on Thursday for a bit of blogging.  I do feel so badly about my lack of visits to your blogs.  I always love seeing your creative projects and being awed and inspired by your work.  I'd love to see you post your projects for My Craft Spot's congratulations challenge too!
21

My Craft Spot Valentine Stamp Release & Giveaway

Thursday, February 2, 2012
I am so excited to be showing you some of the projects that I've made with the new My Craft Spot Valentine stamp sets:  Build a Valentine and Always and Forever.  These sets are just perfect for creating all sorts of Valentine and love projects.  There's even an anniversary stamp!


My first project is a set of cello bags filled with red and pink Smarties (candy coated milk chocolate, similar to - but much better than - MandMs).


For the toppers, I made rosettes from patterned paper and then added hearts from Gypsy Wanderings.  The white hearts are embossed using the inside of a 3x3 Cuttlebug butterfly folder.  I finished things off with a little "Be mine" tag from the Always and Forever set.  These treats are currently displayed on our dining room table and make for a lovely way to decorate for Valentine's Day - with a treat to enjoy at the end!


The base of this card was made with Elegant Edges and Plantin' SchoolBook.  I embossed the top portion of the white mat with a tiny hearts folder from the Cuttlebug Love Language set and scored some lines with my Martha Stewart score board.  The cat image is from Meow and I stamped the cats' eyes with stamps from Peachy Keen.  The noses are covered with Glossy Accents and I drew the little mouths by hand.


The sentiment is from the new Build a Valentine set and I finished things off with some fun Divine Valentine twine from My Craft Spot and lots of faux stitching.


These candy tents were cut by hand, with the topper punched with a Stampin' Up border punch.  The bases of the tents were run through the Cuttlebug using the Heart Blocks embossing folder.


I stamped the tops with a Sweetheart sentiment from Always and Forever.  I added some baker's twine from My Craft Spot and a button to each - as well as a little baggie of Hershey's Kisses - to complete my project.


When I saw these treat bags at our local Bulk Barn, I couldn't believe my eyes!  It looks as though they were made to go with the Build a Valentine set from My Craft Spot!  Of course, I had to buy some and filled them with some heart-shaped jujubes. Both tags were cut using Wrap It Up and tied with some twine from my stash.  The tags were quick and easy to put together - but make for such a fun way to dress up the bags.


For the frog bag, I cut a little frog from Paisley and then stamped the "Looking for a prince?" sentiment from Build a Valentine.


The base of the ladybird is from Walk In My Garden and I created the custom wings (to coordinate better with the ladybirds on the bag) using hearts from Create a Critter, cutting the larger heart in half.  The "Love Bug" sentiment is also from Build a Valentine.


My final project is a little card made with conversation heart stamps from Build a Valentine.  I stamped the hearts on little hearts cut from Create a Critter.  The flowers were also cut from Create a Critter.  The stems are stamped and the mat embossed with a Hallmark embossing folder.  The grass was cut using Martha Stewart fringe scissors.  I did some doodling and also went over the sentiment and pink "stitching" and grass with a Stardust gel pen - so there's a nice glimmer in real life.  I finished everything off with some Divine Valentine twine from My Craft Spot.

Here are the full sets of the stamps I've used for my projects above.  For many more project ideas and inspiration, head to My Craft Spot to see what Kimberly and the rest of the design team have been making!  I always love to see the different ideas and creations.

~ G I V E A W A Y ~
How would you like to win a My Craft Spot stamp set of your choice?  Kimberly has very generously donated a set to be given away on my blog.  All you need to do is:
  1. make sure you are a follower here at Small Bits of Paper
  2. leave a comment on this post.  
Don't forget to tell me which My Craft Spot stamp set is your favourite, in case you are the winner!  I will draw a name at random and announce the winner on Monday, so you have until Sunday at noon (EST) to enter.

~ W I N N E R S ~
Thanks to all of you who left such lovely comments last week's blog hops!  The winner of the $10 My Craft Spot gift certificate for the Cards for Kids Valentine's Day Blog Hop is Larelyn of Handmade from My Heart and the winner of the $10 My Craft Spot gift certificate for the Cricut Craftin' Grammy's Cricut Friends Blog Hop is Bobby of Bits & Pieces.  Congratulations Larelyn and Bobby!!  Please email me at smallbitsofpaper @ hotmail.com [remove spaces] so I can arrange to have your gift certificates sent to you.

*I am going to link up my Smarties tubes and Sweetheart tents at Decorate to Celebrate, where this week's theme is Valentine's Day Party.
61

My Craft Spot Stamp Release Day Two

Tuesday, November 1, 2011
Welcome to Day Two of the My Craft Spot Stamp Release Party!!  Each day this week, EVERY design team member will be sharing a project made with one of Kimberly's five new stamp sets.  My Craft Spot will also be showing photos of the projects and offering prizes just for commenting!  And on Saturday, we have a fun blog hop planned - with prizes at EACH stop along the way!! 

Today's stamp set release is called "White Christmas".  I made a card using the "Wanted: Magic hat!" stamp.
I used Doodlecharms for my snowman and Mini Monograms for the little frame in which he stands.  I embossed the top layer of the frame with a Cuttlebug snowflake folder.  The sign is from Walk in My Garden and it is embossed with Distressed Stripes.  I also added a border using a Martha Stewart snowflake punch.  Glossy Accents were added to the carrot nose and coal buttons, and I used gems for the eyes as well as part of a Peachy Keen stamp (which is actually a frown - but I turned it upside down!) for the mouth.  To finish things off, I used some My Craft Spot Cranberry Crinkle Ribbon for the snowman's scarf.
Don't forget to head to My Craft Spot to see the rest of the Design Team inspiration - and to enter there for your chance to win today's prize: Christmas Eve Crinkle Ribbon (which contains some of the Cranberry ribbon that I used for my snowman's scarf - as well as Olive Green and Gingerbread Cookies ribbon).  How fun!

If you are interested in purchasing the new "White Christmas" stamp set, ALL FIVE sets will be available for purchase at My Craft Spot on Saturday.
25

Daffodil Card for Mother's Day

Monday, May 2, 2011
This week at Fantabulous Cricut, the challenge is "Flower Shower":  Create a project using at least three flowers.  I decided to create a Mother's Day card for my mum, which I will also link up at Cooking With Cricut (spring flowers), My Craft Spot (We love you Mum!), Whimsical Wednesday (spring has sprung) and My Sheri Crafts.   I played around with attaching a tag or sentiment to the front of the card but finally decided to stamp the inside with a simple "Happy Mother's Day". 
When I was first putting this card together, I didn't like the dark blue showing through each of the scalloped portions so I ended up punching circles using a Stampin' Up Itty Bitty punch using the scraps from the patterned paper.  I then attached each little circle behind the openings and am much happier now!

My favourite flower is the daffodil, and I know my mum loves them too.  The daffodils have finally bloomed in our gardens and it seems that spring is finally here!  On Sunday, I know I will be spoiled by my husband and children, beginning with the traditional breakfast in bed.  Later, we will celebrate Mother's Day at my mum's house with my mum, my oldest sister and her family and my oldest brother and his daughter, as well as my husband and children.   The men always order Swiss Chalet so the women get to rest and enjoy the day!  I'm looking forward to it!

Recipe:
George and Basic Shapes: card base, inner circles, yellow "tablecloth"
Easter 2010:  scalloped circle
Kate's ABCs: pitcher (embossed with Cuttlebug border folder from "With love" set)
Walk in my Garden: daffodils
Baker's twine, white Gelly Roll pen, PopDots, various inks from Stampin' Up
Sentiment (inside): Happy Mother's Day from My Creative Time's "Mom, You Rock"

Please head over to Fantabulous Cricut to check out the wonderful design team projects - and to link up your "Flower Shower" project!
36

Share the Love Cricut Crawl

Monday, February 7, 2011
Welcome to the fourth Fantabulous Cricut Crawl - Fantabulous Cricut's version of a blog hop! 

Valentine's Day is in a week and everyone at Fantabulous Cricut has decided to Share the Love!   Each Design Team member will be featuring an original valentine-themed project that includes the word LOVE somewhere on it.

If you've come from visiting Jordan at Cute Cute World, you're in the right place! If you've just happened across my blog and would like to play along with our Fantabulous Cricut Crawl, start HERE.

Make sure to check out each DT member's blog for some awesome inspiration! There will be PRIZES along the way at some of our DT members' blogs AND there will be a Hello Kitty Greetings cartridge (donated by Cut-n-Crop) at FCCB for one participant who submits a Share the Love project!
The other day, we were snowed in.  I spent a wonderful afternoon making cupcakes with my boys.  To spruce things up a bit, we added some paper hearts on little skewers to share the love!  The hearts and shadows were cut from Doodlecharms with the pink cardstock run through the Cuttlebug using a Love Language Small Hearts Folder.  In order to have everything look finished from all angles, we cut a flipped shadow and heart as well.  We glued the front and backs together, leaving a space at the bottom to hide the skewers between the two sides.  We also added the word “love” (cut from Walk in my Garden) on one side and an “xox” cut from Holiday Cakes on the other.  Although we had a great time putting everything together, the highlight was definitely the consumption of the cupcakes!
For this blog hop, I am offering a Smirk For Her 6x6 Designer Pack and a Fiskars Kids’ Birthday clear stamp set.  One lucky crafter will be drawn at random and announced here next Wednesday, February 16.  To enter, just leave a comment.  If you are a follower, you are welcome to leave a second comment telling me as such for an extra entry.

Now it's your turn! Let's see your Share the Love projects!  Make sure to include a Cricut cut and the word LOVE somewhere on your project!

Next stop...  Leinad's blog, Scrap Stickle Pop. Go see what she has in store for you today.  When you're done, make sure to link up your project to FCCB's Fantabulous Cricut Crawl post to be entered into the contest!

Happy Crawling!
78

My Boys Layout

Tuesday, November 23, 2010
I created this layout for a challenge at Serenity Scrappers.  They are giving away a PhotoElf software program.  For the challenge, we were to create a 12x12 layout using three photos - using one of these three themes: Sights of Summer, Fall Frolic and Winter Wonders.  I chose to do Fall Frolic, using photos of my boys (one of which is really my man!) from our trip to the Metro Toronto Zoo in late September.
I cut the large mat from Accent Essentials.  The round photos were cut using the Creative Memories cutting system, which I also used for the circular mats behind them.  I used Opposites Attract for the title and Speaking of Fall for the different leaves.  I felt the page needed more, so went with a turtle from Walk in my Garden to pick up on the turtle crossing sign in one of the photos.  I also embossed the title and the turtle's shell.  I added a little journal box and some gems - and inked everything!  I popped "BOYS", the larger leaves and the turtle.  (I used the same yellow cardstock for all the lettering, leaves, turtle, and journal box - even though some cuts look like they are from a brighter yellow paper in the photos.)
Check out Serenity Scrappers!  There is such a fun group there.  It's certainly one of my favourite blogs!
13

Achoo! Fantabulous Cricut Challenge #36

Monday, November 15, 2010
Well, it certainly does seem to be the time of year for different bugs and viruses going round.  Fortunately, I've been spared so far, but my youngest seems to be getting more than his fair share, poor little guy.  This week's challenge at Fantabulous Cricut is "Achoo" - make a card or project with a get well theme.
I made this card for my mother, who is going in for cataract surgery later this week.  I used Walk in My Garden for the flower and cut it multiple times, starting at 3 inches and working 1/4 inch down for a total of 7 cuts.  The centre of the flower is an Itty Bitty punch from Stampin' Up.  I inked each layer and crumpled them by hand, staggering them as I layered them.  There is a tiny bead in the very middle of the flower.  The sentiment frame was cut from George and Basic Shapes and the sentiment itself is a Stampin' Up stamp and punched with a Stampin' Up punch.  I added two eyelets to the sentiment frame and laced ribbon through it.  I actually inked the ribbon a bit as well as it seemed too bright and new for the card.  The sentiment frame is popped, and the sentiment itself is also popped.  Both mats were inked, and the top mat was run through the Cuttlebug before attaching a large brad from which I "hung" the ribbon.

Head on over to Fantabulous Cricut to see what the other design team members have made to inspire you.  As always, there are great prizes up for grabs and I'd love to see what you create!
15

Hydrangea Card

Sunday, October 3, 2010
This week's challenge at Serenity Scrappers is a colour challenge: purple, blue, and green.  This really was a challenge for me, but I finally figured out what to do.
I used Walk In My Garden to cut the wheelbarrow at 2.5.  The hydrangeas were cut at 4.5.  I used different coloured purple cardstock for the hydrangeas and inked everything with SU's Purely Pomegranate.  (The wheelbarrow was inked with Chocolate Chip.)  I popped the wheelbarrow and the flowers.  I cut green and blue cardstock to size, and embossed the blue with Cuttlebug Swiss Dots.  I then used a MS border punch for the hydrandgea border and a MS 3-in-1 punch for the extra flowers.  I tied a ribbon around the punched border.  I also used a Gelly Roll Pen to add the centers to the hydrangeas.  The sentiment was stamped with a SU stamp and punched out with SU punches.  I also cut some photo corners with an EK Success punch and added gems to the middle of those.
8

Fantabulous Cricut Challenge #17

Monday, July 5, 2010
I am so excited to be part of the Fantabulous Cricut Challenge Blog Design Team!  Thank you so much, Robin, for offering me this position.  This is my first official submission as a member of the team.
This week, our challenge is creepy crawlers with a bit orange.  I actually like insects, with the exception of earwigs.  Fortunately, there are no earwig cuts on any Cricut cartridges!
The little ladybirds (ladybugs) on my card were cut from Walk in My Garden at 1".  I cut 12 of them in pink (one for the inside of the card) and 1 in orange.  The back layer is green and the shadows are all blue.  I heat embossed the orange ladybird to make her stand out even more.  I cut a heart from George and Basic Shapes after manipulating it in Design Studio to get just the right dimensions.  The patterned paper used for the background is Cosmo Cricket and everything else is regular cardstock from my stash.  I also used some cotton "ribbon".  The little flowers on the inside of the card were made with a punch.  The ivory border has a computer generated sentiment.  I also used some Cuttlebug border folders for the straight lines as well as the embossed flowers on the ivory border.  A Stampin' Up border punch was used for the card's inside as well.
I hope you can join us at FCCB this week!  I'd love to see what you create!

(I will also enter this card at The Cuttlebug Challenge blog, where easel cards are the theme of the week.)

If you have not yet entered my CSN Stores giveaway, you have just a bit more time to do so.  Head here to enter to win a $40 gift certificate.
17

Spring Praise ~ Card

Wednesday, May 26, 2010
This card took the entire day to make - but that's because I had to create it in snippets of time.  It's been quite a day!  This card is unusual for me in that it does not have a recipient in mind.  I generally have an idea where my cards are going when I create them.  I'm sure I'll find somebody who needs it!
I found the verse on a digi-stamp at Crafting With Deedee's Digis.  As soon as I read it, I thought of Spring - with little flowers and butterflies - probably due to the "marvelous works" portion.  I knew exactly what I wanted to do.
With the exception of the grass, which was cut with Zooballoo, the images on this card were made with Walk in My Garden.  Papers were all from my scrap stash.
I am submitting this card for the weekly challenge at Crafting with Deedee's Digis.  I am also submitting it for Fantabulous Cricut's Challenge Me Monday, where we were encouraged to create an item using at least three flowers.   At Easy Craft Projects, we were challenged to use buttons, so I will submit there as well.
14

Mother of the Bride Gift Set

Tuesday, May 18, 2010


I decided to create for another project, this time for Challenge Me Monday #10 at Fantabulous Cricut.  This week, we were challenged to made a 3-dimensional project with the colour black.  As the daughter of my son's EA is getting married, I decided to make a little something for her.
This 3-piece gift set contains a bag, a gift card holder, and a card with co-ordinating envelope.  I made the gift bag out of cardstock, which I cut to size and scored.  The bag is somewhat similar to a Christmas bag I learned to make at an SU class in the fall.  I computer generated the sentiment, and then cut a scallop circle with shadow using Mini Monograms.  I also added a butterfly from Walk in my Garden.  I embossed her wings and added a few spots with my silver Gelly Roll pen.  I realized that I did not have the black ribbon I wanted, so headed out to Michaels.  I got back, opened the ribbon and realized.... It was navy!  Anyway, instead I used little silver eyelets and a thin black ribbon, but I think I prefer this over my original idea anyway.  (Now to think of a craft using navy ribbon...)

I next made the gift card holder using the same papers.  The cardstock was cut to 10.25 by 3.5 and scored at 3 inches and 7 inches.  I used double sided tape around the sides at the bottom, and added a bit of velcro for the flap at the top.  I also used my SU corner rounder for the cardstock and paper.  The inside paper was punched with an SU border punch.  I used a small circle punch inside the holder for ease of access to the card (another tip from my SU demonstator).
I cut the card to 4 inches by 9 inches.  After using a border punch, I took off just a bit from the other end so that the cardstock was 8x4.  I then scored at 4 inches to have a 4x4 card.  I also decorated this to co-ordinate with the other items.  I sealed an A2 envelope and then cut it down to size.  I added a flap of co-ordinating paper and a butterfly to carry the theme.  As well, I used white cardstock cut to shape for the inside of the card, and added a tiny butterfly inside as well.
I tucked a Timmy's card inside the gift card holder and wrote a little note of congratulations - with a message encouraging the EA to take a break on us during the busyness of the weekend - whether it be to grab a quick cup of coffee to keep her going, or to put her feet up and relax a moment with a cup of tea.  The card and gift card holder fit inside the little gift bag.
8
Former Design Team Member at My Craft Spot (2011-2015)
My Craft Spot


Powered by Blogger.
Follow on Bloglovin

Followers

>