Small Bits of Paper: Nursery Rhymes

Showing posts with label Nursery Rhymes. Show all posts

Subway Art

Monday, October 10, 2011
Happy Thanksgiving!!
(In Canada, Thanksgiving is always celebrated on the second Monday of October.)

It's all about wall décor this week at Fantabulous Cricut. I've been wanting to try some subway art for some time now, so decided that this would be the perfect opportunity to give it a go!

I first purchased a white canvas and painted it with a light brown acrylic paint.  (It's got a lovely distressed look in person, but it doesn't show up in the photo.)  I then used my Gypsy to design the art. To do this, I added a rectangle to my Gypsy design which was an inch smaller than my canvas. (My canvas is 12x16, so I created a rectangle to be 11x15.) Then I designed the phrases using a variety of fonts, extending each expression to 11 inches in order to have both sides justified. I cut the art from a piece of brown Cricut vinyl. I learned the hard way that one should never cut vinyl on a new mat. It was quite a pain to get the white backing off the mat once I'd removed the vinyl!  I had to remind myself to give thanks in all things and to choose to be happy!!

(The "Choose to be happy" portion is a scaled down version of wall art in my office which I posted about HERE.)

There are some wonderful creations for view at Fantabulous Cricut.  Head over to see what the rest of the design team has been working on - and to link up your own wall décor project.

Cartridges used:
Cuttin' Up
Jubilee
Gypsy Font
Nursery Rhymes
Kate's ABCs
Opposites Attract
Printing 101
Plantin SchoolBook
37

Baby Boy Card - CropStop Creative Team Call

Wednesday, January 12, 2011
A former student of mine just had a baby boy.  I made this card for her.

The patterned papers are Stampin' Up and the cardstock is Textura.  The top mat is embossed with a Cuttlebug folder.  The bear is from Doodlecharms and I drew his mouth with a pale blue Marvy marker.  The little circles in the bottom right were cut with George and Basic Shapes and the heart in the centre is a punch from a bin at Michaels.  The little tag was also cut with George and Basic Shapes and the letters were cut with Nursery Rhymes.  I embossed the little tag with a Cuttlebug butterfly folder*.  The little border was punched with a Stampin' Up border punch.  I added some gems and ribbon to complete the card.

Below is the sketch on which my card is based.  I have sent it in as part of the CropStop Creative Team Call.  For more information on the call, click here.
*The butterfly folder is part of a Cuttlebug die/emboss set which I purchased from CropStop.  I really wanted to use something I'd purchased from CropStop on my card.
14

Choose to be happy

Saturday, January 8, 2011
I recently watched a fantastic video on cutting vinyl with the Cricut and have been going crazy!  Before Christmas, I had snowflakes everywhere and have also cut vinyl to label all sorts of my crafting items (which never leave the house!).  My husband has been teasing me, saying that he's very thankful that he won't get his Expression mixed up with mine (like he even has one!).

The challenge at Papercraft Star this week is to create a project using a New Year's resolution as inspiration.  I've been working hard at exercising more in order to loose a bit of weight by June - but that seems somewhat superficial.  Although I am generally a joyful person, there are times when I am in my office, working alone, that I can be rather unkind to myself when I make a mistake.  In all circumstances, I am given a choice to be happy or not.  I choose to be happy - and for those times when I need a reminder, I have created this wall art to remind me of the choice to make.  It is positioned directly above my laptop screen so I can see it when I am working. 

To create this message, I used Gypsy Font for the word "CHOOSE" and Nursery Rhymes for "to be happy".   Vinyl is WallPOPS. 
12

Vintage Christmas ATCs

Sunday, November 7, 2010
I just finished creating 6 groups of 12 ATCs for a swap on the Cricut message board.  For each group, we were given the song titles to two Christmas songs and were then to create an ATC based on either the title, line, word, or thought from one of the songs.

For group 1, I chose the line "When the clock is striking 12" from Jolly Old St. Nicholas.  I cut the grandfather clock from Nursery Rhymes and then cut off the little mouse.  The background image is computer generated, as is the clock face, which I then cut with a scallop punch and covered with UTEE.  There a border cut with an MS punch, a photo corner made with and EK Success punch and everything is inked.  The clock is also popped.  I added some gold "pearls" to finish things off.  I think that this one is my favourite.

Group 2 represents the song Winter Wonderland.  The image is random.  I used a MS snowflake border punch and the little branches were cut using a MS punch as well.  The Merry Christmas sentiment was stamped with a Carleton Cards stamp and the tag and border were cut out with Stampin' Up punches.  I embossed the background with a Sizzix embossing folder, and used my MS score board as well. Everything is inked and the sentiment is popped.  This card looks NOTHING like my original plan (which started as stamped trees and glitter), but I am pleased with the final result.

I was inspired by the line "Let earth receive her king" from Joy to the World for the third group.  I cut the baby in the manger from Christmas Village (without the cut for the stand).  Both the Joy to the World and star cuts are from Winter Frolic.  I also embossed the background with a Cuttlebug folder and inked some portions of this card.  The baby in the manger is popped.

Group 4 is Sleigh Ride!  I used a Stampin' Up ticket corner punch on the patterned paper (from DCWV's Holiday Stack) and attached some ribbon.  The sleigh is cut from metallic gold cardstock, using Christmas Cheer and attached with Pop Dots.  I attached a coordinating flower to finish things off.  My daughter likes this one best of all.

I chose the line "They who travelled far" from C-H-R-I-S-T-M-A-S for group 5.  I used Versamark to stamp an Inkadinkado stamp on black cardstock and then used gold embossing powder over the image.  I then layered two window frames which I cut using George and Basic Shapes and Accent Essentials.  I embossed the top layer using a Cuttlebug folder and added three gold gems to the bottom.  I love the Victorian look of this card.

Group 6 is Let it Snow.  The pink frame was cut from Ashlyn's Alphabet, the circle frame from George and Basic Shapes, and the snowflake from Joys of the Season (using a metallic white cardstock).  I embossed the circle frame with a Sizzix folder and the background cardstock with a Cuttlebug folder.  The corners were punched with an EK Success punch.  I also added a gemstone to the centre of the snowflake, which is popped. 
13

Fantabulous Cricut - Leaves Challenge

Monday, October 18, 2010
Happy Monday!
This week at Fantabulous Cricut Challenge Blog, the theme is leaves. 
I made this card using paper from a Marcella pad.  It was the first paper pad I ever bought!  I embossed the mat with my Cuttlebug, and punched the corners with a Fiskars corner punch.
I welded the leaves and shadows in Design Studio, using Ashlyn's Alphabet.  The letters are from Nursery Rhymes.  This font has only a blackout shadow feature, which I didn't care for much here, so I made an extra hole in the shadow of the "e" in Design Studio.  The leaves and letters, as well as the edges of the mat, are all inked with a gold ink which is now all over my craft table - and me!!  The border behind the letters was cut using an EK Success punch (which is the most difficult border punch I've ever used.  This was take three, and I'm still not overly happy with it).  I popped the leaves and added a bow.  (Just in case you are not sure, the word spells "merci", which is French for "thank you".)
Please hop on over to Fantabulous Cricut to see the rest of the projects by the Design Team - and add one of your own!
14

Christmas in July

Monday, July 19, 2010
This week at Fantabulous Cricut, the theme is Christmas in July!  I decided to use a frame for my project - something I've not done before.
Most of the papers I used are from DCWV's Holiday Stack.  I cut the lamb at 4.5 from Paper Doll Dress Up.  I cut a few layers.  For the top layer, I cut just the "wooly part" and embossed it.  I drew along the raised portions of the embossing with a glue pen and added glitter.  The manger was cut at 4 7/8, also from Paper Doll Dress Up.  I cut an extra manger with a different paper, and then cut just the straw portion to have a bit of contrast.  Baby Jesus was cut at 3.75.  Again, I cut a few layers, with the top layer in patterned paper.  I embossed the blanket with my Cuttlebug.  Most letters were cut at 1 7/8 from Opposites Attract.  I also cut a shadow for each layer.  The L was cut from Nursery Rhymes at 2 7/8.  I glittered the top layer of each letter.
After I had assembled it all, something seemed missing.  I tried fake straw, some flowers, buttons, and finally decided on some raffia in a bow.  I'm not 100% sold on it at this point though.  At least I've got a few more months until Christmas to think!!
17

Animal ATCs and a Set of Thank You Cards

Tuesday, July 6, 2010
I love to participate in the ATC swaps on the Cricut Message Board.  It's such a wonderful way to learn new ideas and techniques.  I keep an album of my ATCs (and the ones I have received) as a reference tool.

I just finished a number of sets with an animal theme.  Here are my cards:

Group 1A: Butterflies
The butterfly is from Paper Pups and the scallop circle and circle frame are from Mini Monograms.  I used Cuttlebug folders on the circle frame and the background.

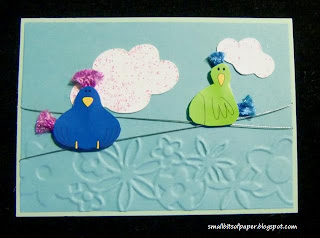
Group 2: Birds
The clouds are from Paper Pups (stickled) and the birds are digistamps from Tortagialla, coloured in Paint.  I used thick thread for the feathers.  I embossed the background with a Cuttlebug border folder.

Group 3:  Zoo Animals
I cut this giraffe from Create a Critter and embossed the background paper with a Cuttlebug folder.  I used stickles for the giraffe's eyes.
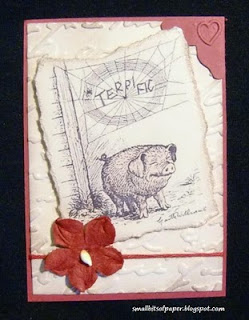
Group 4: Farm Animals
(E.B. White's Charlotte's Web was a favourite growing up.  I still own my tear-stained copy!!)  The image is computer generated and I cut the corner from Jasmine, which I then embossed with a portion of a 2x2 folder.

I also created this set of thank you notes for Serenity Scrapper's Quotes and Notes week.  The ladybird image is cut at 3" from Nursery Rhymes and the little frame was manipulated for size and then cut from Ashlyn's Alphabet.  I used my new gel pen set and holder (from Chomas Creations) to draw Thanks, using the font from Tear Drop.  Again, I had to manipulate the size in Design Studio.  I used smaller pop dots for the sentiment frame and larger ones for the ladybirds.


Amy Chomas has a video tutorial on using the gel pens and holder on her blog.  You can access the video here.
14
Former Design Team Member at My Craft Spot (2011-2015)
My Craft Spot


Powered by Blogger.
Follow on Bloglovin

Followers

>