Small Bits of Paper: Create a Critter

Showing posts with label Create a Critter. Show all posts

Have a Holly Jolly Christmas!

Saturday, November 30, 2013
Happy Saturday! It's my delight to be sharing a project over at My Craft Spot today.  I made these fun little cards to spread some Christmas cheer!


The sweet little reindeer are from Create a Critter and they're adhered to a mat cut from Elegant Edges which is layered on the card base.  I faux stitched around the card base .  The top layer of the mat was embossed with my Cuttlebug to add some fun snowflakes to the background.  To add a bit more interest to my reindeer, I covered their little red noses with Glossy Accents and gave each a festive bow made with My Craft Spot's Christmas Candy Cane baker's twine.


The sentiment is from My Craft Spot's Jingle All the Way stamp set.  It fits perfectly inside the Tiny Doilies metal die cuts.  I popped the doilies on my cards for a bit of dimension.  

Have you checked out My Craft Spot's challenge this week?  It's a Christmas shape card challenge.  Click HERE to see all the design team inspiration and then link up your own shaped Christmas card for a chance to win this week's prize: the NEW Jar Full of Christmas stamp set! 
10

Little Cards for Camp

Tuesday, July 9, 2013
I'm so pleased to be sharing today's project over at My Craft Spot today.  Last week, my youngest was off at camp and I had such fun creating these little cards for him so he could have a little bit of love from home each day!


Each of these cards was made using Create a Critter - for the card base and the critters themselves.  I used a Darice embossing folder for the clouds and a Fiskars punch for the grass.  The snow border and flakes on the penguin card were made with a Martha Stewart punch.  All sentiments are from My Craft Spot

I used Alphalicious to create envelopes for each of the 3x3 cards.  Each one has a stamp punched with the My Craft Spot Postage Stamps metal dies and stamped with a variety of stamps from the My Craft Spot Postage Stamps stamp set.  The border, images, flourishes, sentiments and cancellation stamps are all from this set. I had so much fun adding a little something extra to each of the envelopes!


For the horse card, I used a sentiment from the NEW Down on the Farm set.  (The sentiment is actually "HAY there neighbor" but I just used a portion of it for my card.)


For my sheep card, the "Love EWE" sentiment is from Cute Critters. I also added a bit of embossing to my little sheep.


The "Have a Beary happy day!" sentiment is from the NEW Tiny Tags 3 set.  These sentiments coordinate perfectly with the My Craft Spot Tiny Tags metal dies.


I realize that the penguin card is a bit different from the others in this set I've created, but my little guy LOVES penguins - so I couldn't resist!  I created the "You're cool!" sentiment by combining two stamps from Build a Valentine.


The fun sentiment on this squirrel card is from the NEW Tasty Treats set.  I also used some Cuttlebug embossing folders on the acorn and stamped the face with a Peachy Keen stamp.  I originally had another squirrel on this card but the face looked terrifying!!  A quick return to the Cricut to cut another squirrel and a Peachy Keen makeover seemed to do the trick!


Finally, the sentiment on this fun cow card is from the Cute Critters set. (My husband liked this one the best when I showed him the set.)

Thanks for popping by!  Have a wonderful day!
16

My Craft Spot Release Party - Day Two

Tuesday, June 25, 2013
Welcome to Day Two of the My Craft Spot stamp release party!!  Today, we've got THREE new items to showcase: Pattern Blocks stamp set, Tiny Banners and Toppers metal dies AND Small Alphabet metal dies!!  I am SO excited about today's release as I love the new stamps and dies - and have been having lots of fun with them already.


It will be my youngest son's last day of Grade 5 on Thursday so I created these cards for him to give his teachers.  After creating my card base and mat, rounding the right corners, I used one of the 15 stamps from the the NEW Pattern Blocks stamp set to create the mesh border along the side, using my Stamp-a-ma-jig to line things up each time.  I then created the banner by using a banner die and topper die from the NEW Tiny Banners and Toppers metal dies.  I used different Pattern Blocks stamps on my cardstock to add some interest.  Layered on each of the banner pennants are letters cut with the NEW Small Alphabet metal dies.  I LOVE the way these cards turned out!  


Each card also has a Create a Critter apple popped on the front.  I stamped the leaves of each one with the NEW Pattern Blocks stamps as well.  Under each apple is a sentiment from My Craft Spot's Thank You stamp set.  I finished things off with a Die-namics Notebook Edge border and some Holly Green baker's twine from My Craft Spot.


For more sneak peeks of today's new releases, head over to My Craft Spot.  Plus, be sure to leave a comment there for Kimberly for your chance to win today's giveaway:  Melissa's Favourites Crinkle Ribbon (Spring Breeze, Raspberry Truffle and Vanilla Bean). 

(*All items from this week's release will be available for purchase on Saturday. Woo hoo!)

17

Give Thanks

Monday, November 19, 2012
It's time for another challenge at My Craft Spot!  This week, the theme is Thanksgiving. 


I created this card using Doodlecharms for my basket and Create a Critter for the leaves.  I did lots of inking and also stamped the main part of the basket with a woodgrain stamp before running it through the Cuttlebug with a Distressed Stripes folder.  I added four small brass brads to the basket as well.  The patterned paper is from Stampin' Up. 


I used a sentiment from the My Craft Spot Happy Fall stamp set and used my Stamp-a-ma-jig to stamp the sentiment in three different colours. 

There are some more Thanksgiving projects created by other members of the My Craft Spot design team.  Be sure to check them out!  Also, I would like to take this opportunity to wish all of my wonderful American friends a very happy Thanksgiving later this week!  May you enjoy good food and good company with your loved ones and friends.
14

Falling Leaves

Monday, September 24, 2012

Click HERE for this week's Fantabulous Cricut Challenge Blog post.

This week's challenge at My Craft Spot is Falling Leaves.  We are challenging you to create a project with at least one fall leaf on it.  


I used the new My Craft Spot Stampin' Around Fall stamp set to create the circular leaf border around my window frame.  I first cut paper to size and then used the Creative Memories cutting system to cut the circle out of the middle.  I used the Inkadinkado Stamping Gear set to line up the little orange leaves as I stamped my way around.  (Do the varied thickness of stamps, be sure to keep the cover of the stamping gear set in order to create a tool that can adjust for all your stamping needs.  I felt a bit like MacGyver as I had to get creative with plastic, pop dots and cellotape - but I did it!!)

The little squirrel is from Create a Critter.  The face is stamped with a Peachy Keen stamp.  I also added some orange faux stitching around the card frame. 


The sentiment is also stamped with the new My Craft Spot Stampin' Around Fall stamp set and I used the new My Craft Spot Tiny Doilies metal dies for the scalloped circle and sentiment ring.  These doilies are so easy to work with - and so pretty too!  Mine is popped on my card.  I finished things off with a few more leaves from a Martha Stewart punch.  

Please head over to My Craft Spot to see what the rest of the design team members have made for this week's challenge... and then link up your own Falling Leaves project for your chance to win this week's fabulous prize!


24

Tooth Fairy Box... for a boy!

Monday, August 20, 2012
Happy National Tooth Fairy Day!  I actually did not know that there was such a day... but somebody is on the ball at Fantabulous Cricut and let us all know.  In fact, to honour the day, we are challenging you to include a tooth, tooth fairy or a smile on your project.


This week, a few of the design team members at Fantabulous Cricut were treated to some stamps from Jaded Blossom.  I was one of the lucky ones!  Jaded Blossom is run by Candace and Michelle.  I first met Candace when I started blogging.  In fact, she was on the Fantabulous Cricut design team and really encouraged me as I started crafting.  Candace always had a great knack for creating little trinkets, boxes and favours - and still does!  In fact, Candace and Michelle began Jaded Blossom to create stamps and sentiments geared toward the creation of party items and favours. 

For this week's challenge, I decided to create a tooth fairy box - but one for a boy!  Usually, when I think of fairies, I think of little girls.  However, boys lose their teeth as well and I wanted to create something that a boy could use to keep his tooth safe while waiting for a visit from the tooth fairy.


I used Easter 2010 for the little pillow box and blue spiked circle.  Mini Monograms was used for the white circle, and I used a Jaded Blossom stamp to frame the toothy beaver - which was cut from Create a Critter and stamped with a face from Peachy Keen's Wide Eyed and Bushy Tailed set.  I thought the beaver - with his big teeth - was perfect for a tooth box!  Finally, a little banner was cut from Twinkle Toes and stamped with a Jaded Blossom sentiment.  I did some inking, and then added a button and some fabulous Blueberry baker's twine from My Craft Spot to finish things off.   

Please head over to Fantabulous Cricut to see what the rest of the design team has made for this week's challenge - and link up your own project for your chance to win the Jaded Blossom "Tooth Fairy" and "Tooth Notes" stamp sets. 

I am also going to enter my project at Peachy Keen Stamps Challenge Blog - where this week's challenge is "Box it Up".  

PS  I start my new job today - plus on Wednesday I will receive my thesis paper with comments for modifications to be made... all to be completed and handed back in by next Monday!!  Also, two of my children have birthdays this week.  I'm not sure how I will be able to do it all, and I am reminding myself that these sorts of times in our lives always seem to work themselves out.  I'm just hoping for a few hours of sleep here and there!!
24

Penguin at the Beach

Monday, August 6, 2012
Hello from Niagara Falls!  I feel like I've hardly been home at all this summer - but I'm not complaining one bit!  I am so incredibly blessed to have such wonderful holidays and am enjoying every minute.  I'll be home again next week though... to stay - and will have almost two weeks off before I head back to work.  I have accepted a new position at a local college which means no more commute!!  I'm so excited!  I do have lots to pack into those two weeks but am really hoping to pay more visits to my blogging friends.


This week's challenge at Fantabulous Cricut is "Jump In and Cool Off" which is perfect for the hot and humid weather we've been having!  We are challenging you to create a project with a water theme (i.e., pool, beach, waterpark, etc.).  I decided to make an island beach card for my youngest who LOVES penguins. 

Please head over to Fantabulous Cricut and see what the rest of the design team has made for this week's challenge!  There are some great projects posted!

Recipe:
Penguin - Christmas Cheer
Duck ring and beach ball - Everyday Paper Dolls
Waves - Plantin SchoolBook and Cuttlebug D'Vine Swirls embossing folder
Palm tree - Create a Critter and Cuttlebug Herringbone embossing folder
Sun - Celebrate with Flourish
Island - Just Because Cards
Cloud background - Peachy Keen Stamps
Glossy Accents
Heart Gem
23

My Craft Spot Valentine Stamp Release & Giveaway

Thursday, February 2, 2012
I am so excited to be showing you some of the projects that I've made with the new My Craft Spot Valentine stamp sets:  Build a Valentine and Always and Forever.  These sets are just perfect for creating all sorts of Valentine and love projects.  There's even an anniversary stamp!


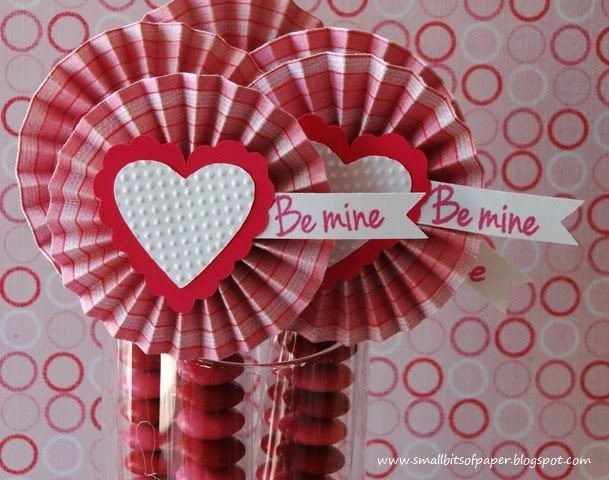
My first project is a set of cello bags filled with red and pink Smarties (candy coated milk chocolate, similar to - but much better than - MandMs).


For the toppers, I made rosettes from patterned paper and then added hearts from Gypsy Wanderings.  The white hearts are embossed using the inside of a 3x3 Cuttlebug butterfly folder.  I finished things off with a little "Be mine" tag from the Always and Forever set.  These treats are currently displayed on our dining room table and make for a lovely way to decorate for Valentine's Day - with a treat to enjoy at the end!


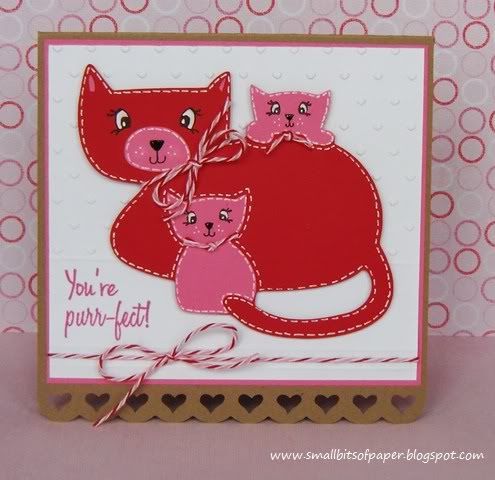
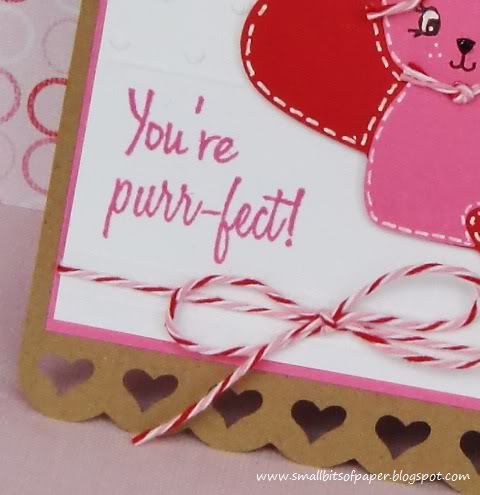
The base of this card was made with Elegant Edges and Plantin' SchoolBook.  I embossed the top portion of the white mat with a tiny hearts folder from the Cuttlebug Love Language set and scored some lines with my Martha Stewart score board.  The cat image is from Meow and I stamped the cats' eyes with stamps from Peachy Keen.  The noses are covered with Glossy Accents and I drew the little mouths by hand.


The sentiment is from the new Build a Valentine set and I finished things off with some fun Divine Valentine twine from My Craft Spot and lots of faux stitching.


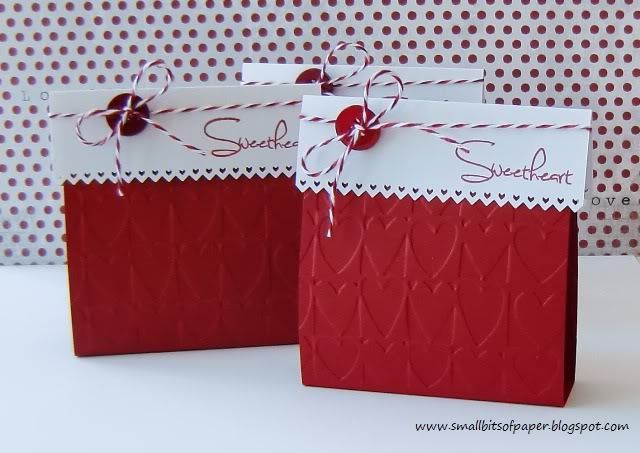
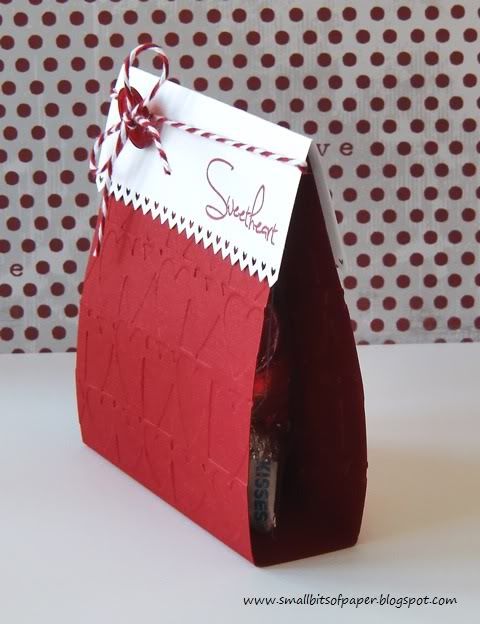
These candy tents were cut by hand, with the topper punched with a Stampin' Up border punch.  The bases of the tents were run through the Cuttlebug using the Heart Blocks embossing folder.


I stamped the tops with a Sweetheart sentiment from Always and Forever.  I added some baker's twine from My Craft Spot and a button to each - as well as a little baggie of Hershey's Kisses - to complete my project.


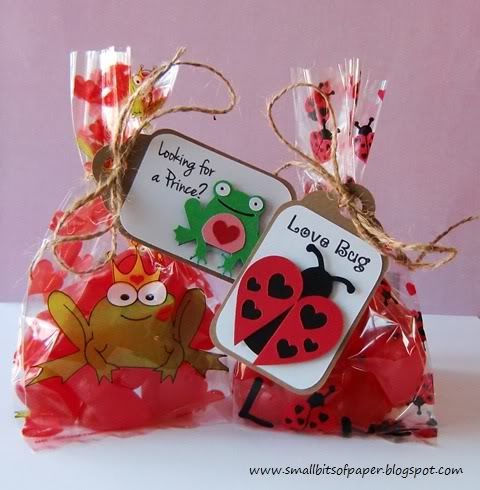
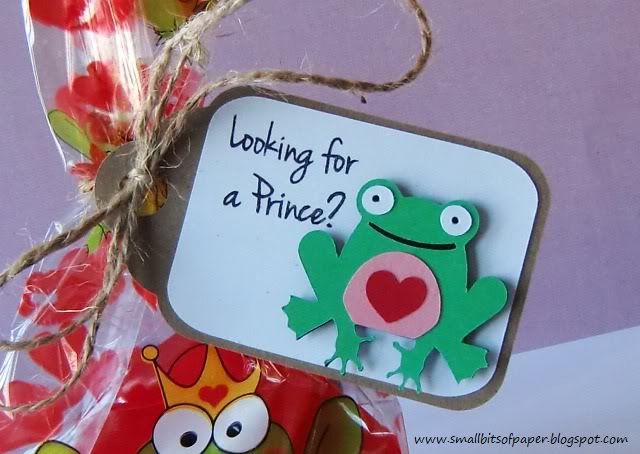
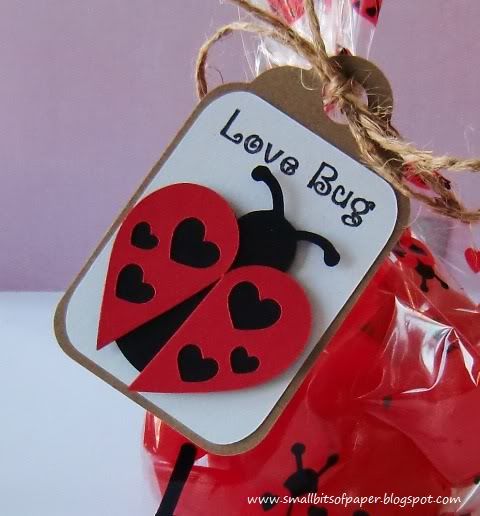
When I saw these treat bags at our local Bulk Barn, I couldn't believe my eyes!  It looks as though they were made to go with the Build a Valentine set from My Craft Spot!  Of course, I had to buy some and filled them with some heart-shaped jujubes. Both tags were cut using Wrap It Up and tied with some twine from my stash.  The tags were quick and easy to put together - but make for such a fun way to dress up the bags.


For the frog bag, I cut a little frog from Paisley and then stamped the "Looking for a prince?" sentiment from Build a Valentine.


The base of the ladybird is from Walk In My Garden and I created the custom wings (to coordinate better with the ladybirds on the bag) using hearts from Create a Critter, cutting the larger heart in half.  The "Love Bug" sentiment is also from Build a Valentine.


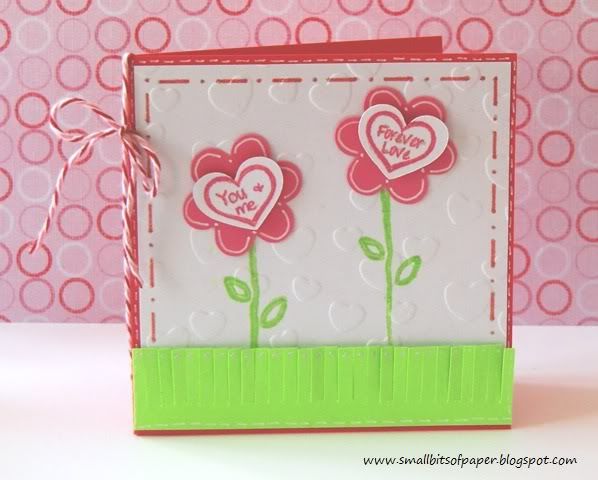
My final project is a little card made with conversation heart stamps from Build a Valentine.  I stamped the hearts on little hearts cut from Create a Critter.  The flowers were also cut from Create a Critter.  The stems are stamped and the mat embossed with a Hallmark embossing folder.  The grass was cut using Martha Stewart fringe scissors.  I did some doodling and also went over the sentiment and pink "stitching" and grass with a Stardust gel pen - so there's a nice glimmer in real life.  I finished everything off with some Divine Valentine twine from My Craft Spot.

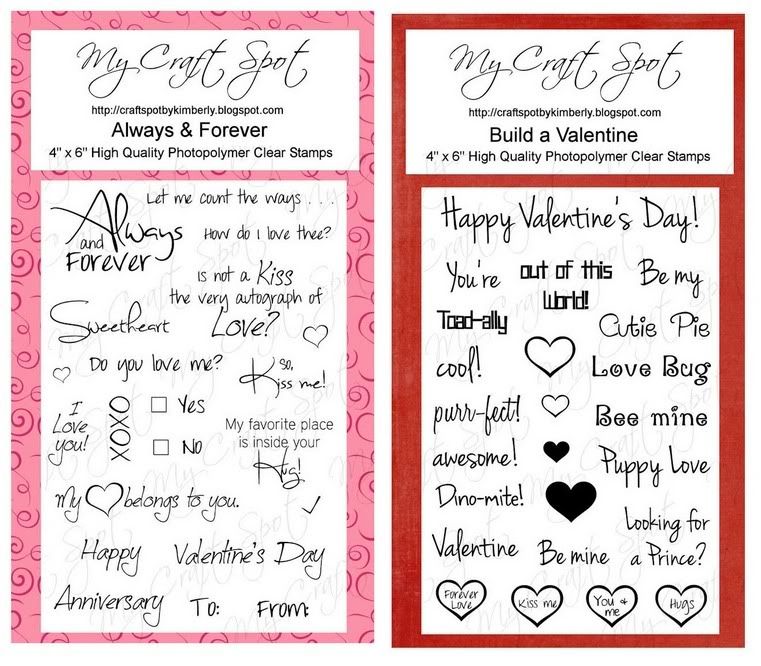
Here are the full sets of the stamps I've used for my projects above.  For many more project ideas and inspiration, head to My Craft Spot to see what Kimberly and the rest of the design team have been making!  I always love to see the different ideas and creations.

~ G I V E A W A Y ~
How would you like to win a My Craft Spot stamp set of your choice?  Kimberly has very generously donated a set to be given away on my blog.  All you need to do is:
  1. make sure you are a follower here at Small Bits of Paper
  2. leave a comment on this post.  
Don't forget to tell me which My Craft Spot stamp set is your favourite, in case you are the winner!  I will draw a name at random and announce the winner on Monday, so you have until Sunday at noon (EST) to enter.

~ W I N N E R S ~
Thanks to all of you who left such lovely comments last week's blog hops!  The winner of the $10 My Craft Spot gift certificate for the Cards for Kids Valentine's Day Blog Hop is Larelyn of Handmade from My Heart and the winner of the $10 My Craft Spot gift certificate for the Cricut Craftin' Grammy's Cricut Friends Blog Hop is Bobby of Bits & Pieces.  Congratulations Larelyn and Bobby!!  Please email me at smallbitsofpaper @ hotmail.com [remove spaces] so I can arrange to have your gift certificates sent to you.

*I am going to link up my Smarties tubes and Sweetheart tents at Decorate to Celebrate, where this week's theme is Valentine's Day Party.
61

Cards for Kids Valentine's Day Blog Hop

Tuesday, January 24, 2012
Welcome to the Cards for Kids Valentines Day Blog! If you have come from a visit with Jessica at Cricut After Dark, you're in the right place. If you're just joining us, please go to Faith Abigail's blog at Faith Abigail Designs and start at the beginning.

Valentine's Day is the perfect time to show someone how much you love them. So this year, let's send a little love to those that need it most!

For this blog hop, each one of us has created a Valentine's Day card for a sick child and we're asking you to do the same! Simply create a Valentine's Day card, link it to this blog entry (link-up will remain open until February 7 at 12:00am) and then mail it to:
Faith Abigail
10621 Fuller Ridge Circle
Charlotte, NC 28270
On February 10th, all of the cards will be collected and donated to a local children's hospital. Please include a small message inside your card. Envelopes are not necessary. 

Now, what would a blog hop be without prizes?! We have some amazing prizes donated by some very talented and generous women and lots of ways to win!

Krystal Andrew at Getting Cricky has donated one of beautiful Valentine Stamps sets!

Nicole at The Twinery has donated The Ultimate Colour Sampler Pack featuring fourteen gorgeous colours of twine!

Monique at Monique Griffith Designs has generously donated FIVE of her fantastic Cricut Kits: The Simple Life, Toy Story, The Stampede,  Mom and Me, and Catch a Wave.

All winners will be chosen by random.org. In order to win:
  • Be a follower of Faith Abigail Designs @ Faith Abigail Designs (one entry) 
  • Like Faith Abigail Designs on Facebook @ http://www.facebook.com/faithabigaildesigns (one entry) 
  • Leave a comment on this blog post (one entry) 
  • Leave a comment on each of the designers' blog posts (one entry each) 
  • Post about this blog hop on your blog, website or Facebook and link back to this post (one entry each) 
  • Create a Valentine's Day card, link it to this entry and mail it to the provided address. Please create and link as many projects as you'd like! (TWO entries for each card submitted!)
Here is the card I made for the Cards for Kids Valentine's Day Blog Hop:

The little dinosaur was cut using Create a Critter.  Using my Gypsy, I hid the contours of his spots in order to use little hearts (also from Create a Critter) instead.  I stamped the sentiment using the new Build a Valentine set from My Craft Spot and then added two little hearts using a stamp from My Craft Spot's new Always & Forever set.  (If you haven't had a chance to check out these new stamps sets, head over to My Craft Spot now!  Currently, Kimberly has an amazing package deal for stamps and Valentine's twine - perfect for all your Valentine's Day crafts!)  I finished my card off with a bit of baker's twine from My Craft Spot and also stamped "Happy Valentine's Day" inside.  The scalloped circle and square were created using punches from Stampin' Up.

Blog Candy!
My Craft Spot
Here at Small Bits of Paper, I am giving away a $10US gift certificate to My Craft Spot!! To be eligible to win this prize, you need to be a follower of my blog and leave a comment on this post.  I will announce the winner on February 2.

Thank you for checking out my Cards for Kids Valentine's Day card! Please continue along to Larelyn at Handmade From My Heart and don't forget to check out all of the wonderful projects that the rest of the designers have created!

Blog Hop Order:


42

It's Turkey Time!

Monday, November 7, 2011
It's not too late to join the My Craft Spot Christmas and Winter Stamp Release Party Blog Hop!  Click HERE to see my post.  Leave a comment by tonight in order to be eligible to win a newly released 'Tis the Season stamp set from My Craft Spot.  I'll announce the winner tomorrow!

Please click HERE to go to my Fantabulous Cricut post for today.

It's time to Gobble 'Til You Wobble at My Craft Spot, where this week's challenge is all about Thanksgiving décor.  I decided to make these fun turkey place settings for my family.  We've already celebrated Thanksgiving here in Canada, but everybody is so delighted with my turkeys that we've been using them at the dinner table all week!  I'll put them away soon, though, and save them until next year.


The fun little turkeys are from Create a Critter.  I did lots of inking, adding some embossing with my Herringbone and Swiss Dots Cuttlebug folders and did some doodling too.  The eyes are from a Peachy Keen Critter stamp set.  I even added a little baker's twine bowtie, using some wonderful vintage twine from My Craft Spot.  The "Turkey Time" sentiment is from My Craft Spot's Happy Fall set, and I punched it out with a Stampin' Up window punch.  (I've got to say that my youngest LOVES this stamp.  He thinks it's so funny and calls out "Turkey Time!" whenever he sees the place settings!)


The bottoms of my place holders are bits of branches with part cut off in order to make a solid base.  There is also a slit in the top in order for the turkeys to have a spot to sit.  They do have legs tucked away!   I used Cuttin' Up for the font for our names, and added some ink and doodling to those as well.

Please head over to My Craft Spot to see what the rest of the Design Team has made to decorate for Thanksgiving!  And don't forget to check out the fabulous new Winter and Christmas stamp sets while you're there!
32

Watch for Falling Leaves!

Monday, September 26, 2011
As I went to make my card for this week's Fantabulous Cricut "Leaves are Falling" challenge, I realized that I don't have any paper packs specific to fall.  I've got a few loose bits of patterned paper but the pieces didn't really go well with each other.  I decided that the dull tones in my DCWV Bella Cafe stack seemed to fit the job and used them.  I'm glad I did!  The little trim at the bottom is actually part of the paper and I think it looks like a leaf-covered road.
I cut the tree from Create a Critter.  I hid the contours of all the little leaves and then cut them separately from a piece of coordinating paper.  The foliage portion of the tree is popped and I also popped each of the little leaves.  (I had to layer the tree a bit differently than it is "supposed" to be, in order to do the popping I wanted to do.)  The mat and shadow are from George and Basic Shapes.  The little squirrel is from Car Decals, cut once as a brown silhouette and then again with all but the outer contour hidden. I put the patterned image behind the silhouette.  I finished things off with a wonderful sentiment from My Craft Spot's Happy Fall set. 
I know that a lot of you have been busy making your own fall projects - so this is a perfect time to link up at FCCB.  Be sure to check out the creations made by the rest of the design team, too!  I'm always delighted to see the projects each week!
27

Fall Leaves

Monday, September 19, 2011
It's time for another challenge at My Craft Spot!  This week, the theme is "Fall Leaves".  Here in central Ontario, the leaves are just starting to change colour - thanks to the cooler temperatures we have been having.
I created my little scene using Campin' Critters, adding some extra little leaves cut from Create a Critter.  The card base was created by welding a frame from Elegant Edges (with thanks to my husband for hitting almost every Michaels in the Greater Toronto Area with me in order to find this cartridge!) and George and Basic Shapes.  The banner is a parenthesis from Plantin' SchooolBook, with the ends cut with a punch from Creative Memories, and stamped with two stamps from My Craft Spot's Happy Fall set.  I did some inking and some drawing and then finished everything off with some glorious My Craft Spot marmalade crinkle ribbon.

If you haven't checked them out already, please head to My Craft Spot to see the other "Fall Leaves" projects created by the rest of the design team.  Then link your own project to be eligible for this week's prize!

(Also, just a heads-up that My Cut Search is celebrating their one-year blogiversary this week.  Later this week, they will be offering special promo codes in their "News" section.  My Cut Search is a great way to find specific Cricut cuts.  Be sure to check it out!)
36

A Splash of Colour

Monday, August 29, 2011
It's time for another challenge at Fantabulous Cricut, and this week, we are challenging you to add a splash of the colour YELLOW  to your projects!  I made a fun birthday card and included a yellow shirt, yo-yo and sun.  (The colour looks a bit orange in the photo, but it really is YELLOW!)
I used Car Decals for the little boy.  I really LOVE this cartridge!  I used George and Basic Shapes for the eyes (I don't care much for the mis-matched eye sizes that come with the cartridge) and for the black frame.  The sun is an image from Create a Critter and the nine is from Mickey Font.  The cute little boy and the number 9 are popped for a bit of dimension.  I embossed the blue background with a Cuttlebug Spots and Dots folder and also created a border on the green grass with an EK Success border punch.  I finished everything off with a sentiment from My Craft Spot's Sweet Sentiments Set #1.

If you have not seen the new My Craft Spot Fall Stamp Release, you can check it out HERE.  In fact, there is still time (but not much!) to join the Stamp Release Blog Hop, where you can WIN a new stamp set at each blog along the way!  Winners will be announced tomorrow - so join the fun now!

Head on over to Fantabulous Cricut to check out the rest of the design team projects - and then link up your own YELLOW creation! 

I'm also entering this in the Cricut Circle's weekly challenge: ABC 1-2-3 (A pop of Bright Colour - yellow, one yo-yo, two eyes and three layers to the sun). 

I've just discovered Paper Playtime - thanks to Janis - so will enter my card there as well.  It's a fun site with lots of creativity.  Check it out!
31

Friendship Day Card

Monday, August 1, 2011
*The United Nations has declared July 30 as International Friendship Day.

Happy Friendship Day!  To celebrate this day, the Fantabulous Cricut design team has been busy making fun projects for friends. 
 
I've seen a few window cards lately and decided to try one myself.  I used Create a Critter for all the cuts.  (It's unusual for me to use only one cartridge - but it worked out for this card!)  The papers are from My Mind's Eye.  I also added a punched border using a Martha Stewart lace border punch and some ribbon from My Craft Spot.  It's actually crinkle ribbon, but I ironed it for a smoother look.  I did lots of inking, added a gem on the bow and used a silver Gelly Roll pen on the butterfly.  The "friends" stamp is one that I've had for quite some time but I'm not sure who the maker is.

Please head over to Fantabulous Cricut and see what the rest of the team has created.  This also makes the perfect opportunity for you to create something for a special friend as well!

Good news!  My summer courses are finished!  I've already submitted my final assignment for one of the classes and hope to have the other one turned in within the next few days so I can enjoy a bit of free time.  July was such an intense month and I do apologize for my lack of commenting on your blogs.  I'm starting to work my way around though so should be dropping by to see you soon!
39

You Knock My Socks Off

Sunday, July 24, 2011
Some of the Fantabulous Cricut Design Team members were sent the Quirky Quotes stamp set from Scrappy Moms Stamps. The set includes some really fun expressions.  You can check out the Fantabulous Cricut Spotlight page HERE to see some of the other stamps in the set put to good use.  As soon as I received my set, I looked at the stamps and knew exactly what I wanted to make first!!
I created this card using the Meow Lite cartridge.  I also used Create a Critter for the cloud and a Stampin' Up border punch.  I did lots of doodling and also popped the cat and socks for a bit of dimension.

Scrappy Moms Stamps are sponsoring the challenge at Fantabulous Cricut this week.  Head on over and submit your project to win your own set of Quirky Quotes!
29

Birthday Banner for a 9 Year Old

Saturday, July 23, 2011
I am so excited to be a guest designer for My Sheri Crafts!  This week's challenge is "Party Favours" - and it's actually a two week challenge which means that you have 14 days to get your submissions in.  The theme is perfect for me as all my children have August birthdays - so our month will be filled with parties, cakes and lots and lots of fun!
I decided to make a banner for my youngest, who is turning 9 years old.  I chose some bright, fun colours for the banner.  The main scalloped squares were cut with Celebrations and the letters for "NINE" were cut with Mickey Font.  I embossed the top layers of the letters with two different Cuttlebug folders.  The party snakes are from Create a Critter.  I assembled the banner with some ribbon and added some tulle to finish things off.

I actually took some time this week to make this banner and also created a card which I will post tomorrow.  (My other projects for this month were all completed before my July class started.  I have next to no free time - but it was such a delight to turn on my Cricut again and take a mental rest.  I have just one week left of classes.  I am enjoying them and learning so much but am certainly looking forward to a break too!

Please head over to My Sheri Crafts and link up your own "party favour" projects - and see the rest of the fabulous design team inspiration.  Thank you, Sheri, for allowing me to guest design for you!  

*I've also added this project at Decorate to Celebrate for their child's birthday challenge.
20

Canada Day Blog Hop

Friday, July 1, 2011

HAPPY CANADA DAY!


Welcome to the CANADA DAY BLOG HOP hosted by Tara & Jacqueline!  If you have arrived here from Tara's blog, Homemade Happiness, then you are in the right spot. If you just happened upon my blog and would like to start at the beginning of the hop, please click HERE. In honour of Canada Day, we are all making projects with a Canadian theme to celebrate our nation's birthday! 


I chose to make two types of treat bags and a set of little cards.  

The wind was perfect for this shot!!
I found some red and white jelly beans at our local bulk food store and made little bags for them using Wrap It Up.  I hid the contours of the tie (which was originally on the bag) and replaced it with a leaf from Create a Critter.  I then added some transparency behind each leaf shape in order to keep the jelly beans inside.  I also added some extra score lines at the top of each side in order to have the bag close at the top.  I tied and curled some ribbon to each bag to finish things off. 


I also found some chocolate covered jujubes at the bulk food store and put them inside small, clear baggies.  I cut bag toppers, rounded the corners, punched bottom borders and ran the toppers through my crimper.  I then computer generated small tags with a patriotic, flag waving beaver and the words "Fresh Canadian Beaver Droppings".  To finish off the toppers, I attached Create a Critter leaves which I had embossed with my Cuttlebug.  Oddly enough, despite the caption on the bags, my children and nieces are quite excited to get their baggies!

The leaves are stamped with "Love you!" - a My Craft Spot stamp
I also made these cute little cards for my husband and children.  I used George and Basic Shapes to cut the red rectangles for either side of the flag and the little leaves were cut with Create a Critter.  I then used a "Love you!" stamp from My Craft Spot's Inside and Out Set #2 to stamp the flags with VersaMark.  I added some My Craft Spot baker's twine and had a quick set of cards already to go!

MY PRIZES

Here on my blog, I am giving away a $15.00 gift certificate to My Craft Spot.  In addition, Kimberly from My Craft Spot is donating a $15.00 gift certificate to her shop.  That means there will be TWO lucky winners here just at Small Bits of Paper!!  You can see Kimberly's fabulous stamp sets HERE.  While you are there, check out her great selection of hand-dyed crinkle ribbon and baker's twine as well.  Kimberly offers FREE SHIPPING to Canada (and the US), and as all Canadians know, this is a big deal!!  For your chance to win one of these two gift certificates, simply leave a comment on this post.  You do not need to be a follower to win.  However, if you are a follower of my blog, you are welcome to leave a second comment indicating as such for an extra entry into the random draw.  You have until midnight on Tuesday, July 5 to enter and I will announce the winners on Wednesday, July 6.

 BLOG HOP PRIZES

The following are the prizes being offered by the sponsors of the blog hop.  In order to win one of these prizes, please comment on the Canada Day Blog Hop stops and then link your project at Homemade Happiness.

The Scrapbooking Cafe - 3 X $10.00 GC

************
 Bugaboo Digital Stamps --- 7 Digital Stamps
************

Pink By Design --- Canadian Stamp Set
************

My Stamping Studio - Lime Twist Products pack from My Mind's Eye

************
Digis With Attitude! --- $10.00 gift card
************
Graphic Cat Creations --- Freebie + $15.00 gift card
************
One Crazy Stamper --- $25.00 gift card

Please be sure to drop by our sponsors to show some appreciation for their support. 

Your next stop is a visit with Heather at Princess Paper Projects.

I hope you enjoy our Canada Day Blog Hop.
Thanks for joining us and hopping along!

HAPPY CANADA DAY!

Here is the hop list in case you get lost:
Tara - http://creativeprincess-homemadehappiness.blogspot.com/

*My wonderful friend, Angi, from Angi & Cokie Designs, is hosting a gift bag challenge at Do More With Less.  I will enter my treat bags there!
50
Former Design Team Member at My Craft Spot (2011-2015)
My Craft Spot


Powered by Blogger.
Follow on Bloglovin

Followers

>