Small Bits of Paper: Paper Pups

Showing posts with label Paper Pups. Show all posts

My Craft Spot Release Party - Day Three

Wednesday, June 26, 2013
Welcome to Day Three of the My Craft Spot stamp release party!!  The team has all had fun with today's stamp set release:  Down on the Farm!   As soon as I saw the set, I knew exactly which stamp I wanted to use... probably because I howled with laughter when I first read it!!  I figured that if it made me laugh so hard, it would make a perfect pick-me-up for somebody having a rough ("ruff") time!


I created my box using slightly modified instructions from Split Coast Stampers (found HERE). Before assembling the box, I stamped around the kraft cardstock with a little paw-print from Studio G.  It's actually from a cat set, but who's to know?!  The fun paper is from DCWV's The Pets Stack and backed with some black cardstock.  The sweet little pup and hydrant are from Paper Pups - as is the bone at the top of the box.  


I created a dog tag using circles cut from my Creative Memories Custom Cutting System and stamped it with the hilarious sentiment from My Craft Spot's NEW Down on the Farm stamp set.  I finished everything off with a fire hydrant brad from my stash and some fabulous red jute string from My Craft Spot.


Be sure to check out the rest of today's Down on the Farm creations over at My Craft Spot.  While you are there, don't forget to leave a comment for Kimberly for your chance to win today's fabulous prize: the Best Witches to You stamp set!  

(*All items from this week's release will be available for purchase on Saturday.)


14

My Craft Spot Spring Stamp Release Party - Day 5

Friday, April 26, 2013
Welcome to Day 5 of the My Craft Spot Spring Stamp Release Party! I hope you've been having as much fun as the design team this week!  Tomorrow, we'll release pictures of ALL the new stamp sets and metal dies - plus, everything will be available for purchase.  For now, we are showcasing projects created with the NEW Feel Better Soon stamp set.  


I created a card with a sick little pup in bed from Paper Pups.  I used a variety of papers from my scrap caddy and rounded the corners with a Creative Memories corner rounder.  The little eyes on my pup were stamped with a Peachy Keen stamp and I used Glossy Accents on the nose and thermometer (part of which I had coloured with a red marker).  I popped the image on the card and used some My Craft Spot Blueberry baker's twine to use as a border between the two background papers.


Along the bottom of my card, I stamped a sentiment with the NEW Feel Better Soon stamp set, adding some tiny star buttons from Calico Cottage Crafts.

Head over to My Craft Spot to see the fun and fabulous creations made by Kimberly and the rest of the design team!  Leave a comment there today for your chance to win your choice of 5 colours of baker's twine!  And be sure to come back for tomorrow's blog hop - where there will be prizes at EACH stop along the way!  You'll also have the opportunity to purchase the NEW stamp sets and metal dies!
11

My Craft Spot Stamp Release Party - Day Two

Tuesday, March 27, 2012
It's Day Two of the Stamp Release Party at My Craft Spot.  Weren't yesterday's projects from the Happy Easter set fabulous?!  Be sure to check them out if you missed them.

Today's stamp set is Birthday Wishes!
(All of the new stamp sets will be available to order and ship on Saturday!) 


I used Paper Pups for my happy little dog and his hat is from Doodlecharms. 


I used a Peachy Keen stamp for the dog's eyes and gave him some rosy cheeks and a few freckles.  His nose is covered with Glossy Accents for a fun shine!  I also added some faux stitching around the mat cut from Elegant Edges and around the party hat. The sentiment is from the NEW My Craft Spot Birthday Wishes set.


I used a Fiskars Punch inside the card - and decorated it with an extra party hat from Doodlecharms.  The inside of the card is stamped with another Birthday Wishes stamp from My Craft Spot.

Be sure to head over to My Craft Spot to check out the rest of the sneak peeks - plus to enter for your chance to win today's prize, a fun set of Bitty Bags!  And don't forget to come back tomorrow for Day Three of the My Craft Spot Stamp Release Party!
 
I am also entering this card at Peachy Keen Stamps Blog, where this week's challenge is to use faux stitching on your card.
26

Pool Time!

Monday, July 4, 2011
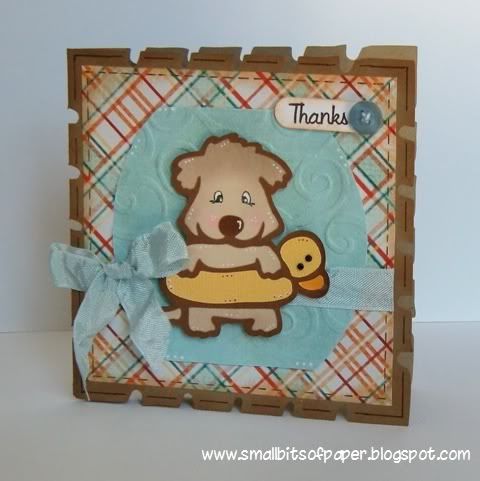
This week's challenge at Fantabulous Cricut is Pool Time:  create a water-themed project.  I knew right away that I wanted to use the sweet little "water dog" from Paper Pups for this one.

I cut the card base using Wrap It Up (welded with my Gypsy) and the blue mat from George and Basic Shapes.  I embossed the mat with D'Vine Swirls too.  I did a fair bit of inking and used a Peachy Keen stamp for the eyes.  I added some doodling all over and Glossy Accents to the pup's nose and duck's beak.  I also gave the duck some little black gem eyes.  The sentiment is from My Craft Spot's Sweet Sentiment Set #1 and cut out with a Stampin' Up punch.  I also added a little bit of My Craft Spot baker's twine to the button by the sentiment and finished everything off with some wonderful crinkle ribbon from My Craft Spot

If your weather is anything like ours, Pool Time is a perfect theme for this time of year!  Please head over to Fantabulous Cricut to see the wonderful projects created by the rest of the design team - and link up your own water-themed project!

If you have not yet entered my Canada Day Blog Hop giveaway, there is still time! 
(Click HERE to go to the blog hop post.)
EVERYBODY is invited to participate.  You have until Tuesday at midnight to submit your comment to be eligible to win one of two $15 gift certificates from My Craft Spot

Finally, I am back to class today for full-time studies through the month of July.  While I certainly hope to be able to make blog visits, my time will be especially limited this month and I might not be able to make my regular rounds.  I'll be by whenever I can though!  I love to see your creations!
22

My Teeth are Mithing

Thursday, March 31, 2011
This is actually an old project, done back in 2009 - before I had a blog.  I had posted it on the Cricut Message Board (and even got a mention in the Chirp for it).  However, my friend, Tara, at Homemade Happiness, is giving away a Jubilee cartridge to celebrate her 100+ followers, so I thought that I would add this layout to my blog to demonstrate the fun that can be had with Jubilee!  It's not on my blog and I want to have a Jubilee link to it - so here it is!

I made this layout to treasure my youngest's toothless smile.  I used Jublilee for the "my teeth are mithing" lettering and then created a frame for it using Zooballoo.  I simply removed the snow in DS.  The teeth were from a file shared by OkieLadyBug.  I used Mickey Font for Egad, Paper Pups for the dog (and used DS to remove his two front teeth!!).  I also did some embossing with my Cuttlebug.

If you are interested in Jubilee, head over to visit Tara at Homemade Happiness!  
16

CropStop Challenge - Valentines for My Boys

Tuesday, January 11, 2011
I was so excited to read that CropStop has started their own challenge blog.  The first challenge is based on a sketch by Gloria Stengel (see below).  I actually made two cards - valentines for my boys.
The first card is for my youngest.  Although the image (a Me and My Big Ideas sticker) might seem a bit odd for a valentine, it just fits my youngest perfectly.  He loves to visit and go places - and is only 8 so still needs reminders of what and what not to pack.  I thought the embossed sentiment (Cuttlebug) tied in perfectly and I coloured it to make it stand out a bit more.  I used patterned papers from the DCWV Pet Stack and cardstock is from a Textura pack.  I used Celebrations for the banner, with the XOX created with Mickey Font.  The corners were cut with Jasmine.  I also cut a heart with Jubilee and embossed it with a Cuttlebug folder.  I added a few half beads too.

(I will also enter this card at The Cuttlebug Spot, where this week's projects are to be inspired by a song.  I was disappointed as I missed the challenge last week - but just realized that it has been extended so I can join in! I was playing the Beatles as I made this - and also YouTubed the wedding scene from Love Actually.)
The second card is for my middle guy.  He loves anything with fur, fins, feathers or scales!  I used papers from the same stacks, but used an EK Success punch for the corners.  I made the banner the same way I did the card above.  The background mat was embossed with another Cuttlebug tiny hearts folder and the little pup silhouette and shadow were cut with Paper Pups.  The sentiment is Studio G and I used my Creative Memories cutting system to cut it out, along with a shadow.  I also used an EK Success border punch for one of the mats and frames.  Half beads were added to this card as well. 
I'm so pleased with how these cards turned out!  It feels good to have the first two done!
13

Smile! It's a FCCB Challenge!

Monday, August 9, 2010
First of all, I apologize for my absence.  Within hours of submitting my last paper, we headed out the door and began our summer holidays.  We've been to Ottawa, camping at Emily Provincial Park, and are now in Florida (at least I hope we are - this is a pre-scheduled post!).  After Disney, we'll be doing some more camping back in Canada and I should be home by late August.  I'll have lots of catching up to do!
This week at Fantabulous Cricut, the challenge is to create a project using the word smile.  As soon as I heard the challenge, I pictured this crazy dog from Paper Pups!  I used Design Studio to hide some contours and cut the image three times - once in white (for those teeth) and then in two different browns.  I used some DCWV Pet Stack paper, some Stampin'Up paper, and some regular cardstock too, which I punched with an EK Success border punch.  I also added a brad that seemed to fit the theme quite nicely.
The inside of the card was done using George and Basic Shapes with Cuttin' Up.  It's one of the first cuts I ever created with Design Studio - and I have saved it all this time.  I'm so glad I did, as all I had to do was add paper to the mat!

I hope to see you all playing along at FCCB this week!  By the way, have any of you noticed the date today?  It's 8-9-10!
13

Fantabulous Cricut Challenge #18

Monday, July 12, 2010
This week, the challenge at FCCB is to create something with a cool treat (as an optional shape card).  I decided to go for a lemonade stand!  This card took me a bit more time than usual, but I am so pleased with the results that I say it was worth it!
I started by welding some shadows of the lower case letter "l" from Pooh Font Set.  (In case you haven't seen this cartridge, one of the fonts looks like bits of wood.  That's the font I used for this project.)  I resized the letters to get the look I was after.  I also welded a shape from George and Basic Shapes to be used as the back of the card.  I then cut the wood three times - twice on regular cardstock and once on some woodgrain pattern paper that I found. I was really trying to make the card look like it was made from planks, so the combined layers make the "wood" thicker than usual.  I ran the woodgrain layer through my Cuttlebug and also inked it.  I then assembled all the bits in the shape of a lemonade stand and added brads for nails. 
I then cut two layers of grass from Zooballoo (one was flipped in Design Studio).  I cut some little flowers (also from Zooballoo) and created centers for the flowers with a little punch.  I drew in the middle of the flowers with a Gelly Roll pen.

The little butterfly was cut from Paper Pups.  For the back layer, I used Design Studio to hide the inner contours before cutting.  I also used my Gelly Roll pen to draw a few spots on the butterfly's body, and turned up the top layer of wings for added dimension.  The tips of the butterfly's wings are glued to the window frame of the lemonade stand.

I used the creamer from Everyday Paper Dolls for a pitcher.  The little glass was made by welding the sleeping bag (!) from Everyday Paper Dolls to a little square with rounded corners from George and Basic Shapes.  I cut these images twice - once using transparency and once using a light yellow cardstock.  I recently purchased some vellum adhesive, and used this to adhere the cardstock to the transparency.  I very carefully adhered the bottoms of the pitcher and glass to the window frame.

On the inside of the card, I used a piece of sky patterned paper.  I also used Jasmine to cut some photo corners just to give the inside of the card a more polished look.
After all this, I remembered that I'm really not a huge fan of lemonade!  I do, however, love to stop at the stands set up by young entrepreneurs in the neighbourhood on the hottest of summer days.  The price of the lemonade is well worth the big smiles that come from serving a paying customer!

I will also enter this card at Cute Card Thursday where this week's theme is summer, at Aud Sentiments where the challenge is to use no sentiment, and at Cupcake Craft where the challenge is to use acetate somewhere on the project.
38

Animal ATCs and a Set of Thank You Cards

Tuesday, July 6, 2010
I love to participate in the ATC swaps on the Cricut Message Board.  It's such a wonderful way to learn new ideas and techniques.  I keep an album of my ATCs (and the ones I have received) as a reference tool.

I just finished a number of sets with an animal theme.  Here are my cards:

Group 1A: Butterflies
The butterfly is from Paper Pups and the scallop circle and circle frame are from Mini Monograms.  I used Cuttlebug folders on the circle frame and the background.

Group 2: Birds
The clouds are from Paper Pups (stickled) and the birds are digistamps from Tortagialla, coloured in Paint.  I used thick thread for the feathers.  I embossed the background with a Cuttlebug border folder.

Group 3:  Zoo Animals
I cut this giraffe from Create a Critter and embossed the background paper with a Cuttlebug folder.  I used stickles for the giraffe's eyes.
Group 4: Farm Animals
(E.B. White's Charlotte's Web was a favourite growing up.  I still own my tear-stained copy!!)  The image is computer generated and I cut the corner from Jasmine, which I then embossed with a portion of a 2x2 folder.

I also created this set of thank you notes for Serenity Scrapper's Quotes and Notes week.  The ladybird image is cut at 3" from Nursery Rhymes and the little frame was manipulated for size and then cut from Ashlyn's Alphabet.  I used my new gel pen set and holder (from Chomas Creations) to draw Thanks, using the font from Tear Drop.  Again, I had to manipulate the size in Design Studio.  I used smaller pop dots for the sentiment frame and larger ones for the ladybirds.


Amy Chomas has a video tutorial on using the gel pens and holder on her blog.  You can access the video here.
14

Celebrate Life card

Thursday, May 20, 2010
Last weekend, I was at Costco when I found a huge case of patterned cardstock for sale.  Of course, I snapped one up and couldn't wait to get home...  Most of the papers are not my style, unfortunately.  However, I did find some that I quite liked, including the choices I used for this card.
The tree is from Paper Pups, and the little bird and nest are from Zooballoo.  I used Mini Monograms for the scalloped circle.  I also did a bit of embossing and inked a sentiment with a stamp from SU.  Everything else was done with a punch.  There's lots of popping on here too.
I am entering this card in the Easy Craft Projects challenge as well.  This week, the theme is spring.  Spring is my favourite time of year - a time to celebrate new life!
I'd also like to give a bit of credit to Jeannie Phillips here.  Her Be My Tweetheart card was featured in the Cricut Chirp a few months ago and has been in the back of my mind since then.  I just loved that card!  I used her idea of the window into the tree to create my own card.  Thanks Jeannie!
4
Former Design Team Member at My Craft Spot (2011-2015)
My Craft Spot


Powered by Blogger.
Follow on Bloglovin

Followers

>